说明
【跟月影学可视化】学习笔记。
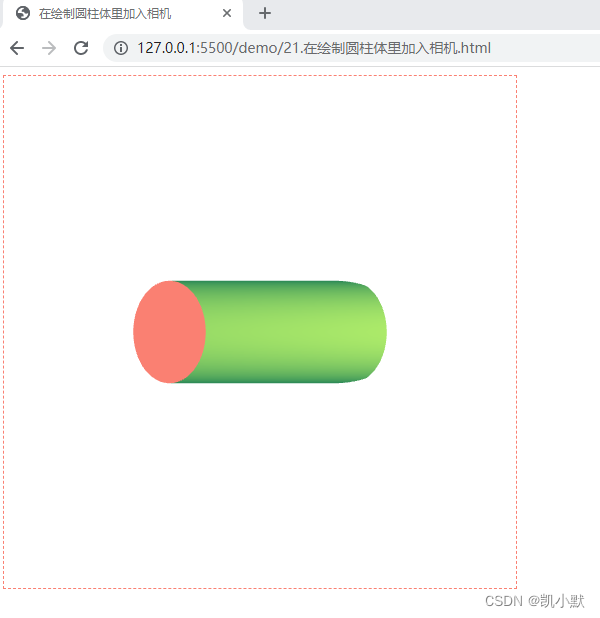
如何理解相机和视图矩阵?
用一个三维坐标(Position)和一个三维向量方向(LookAt Target)来表示 WebGL 的三维世界的一个相机。要绘制以相机为观察者的图形,需要用一个变换,将世界坐标转换为相机坐标。这个变换的矩阵就是视图矩阵(ViewMatrix)。
怎么计算视图矩阵?
- 先计算相机的模型矩阵
- 然后对矩阵使用 lookAt 函数,得到的矩阵就是视图矩阵的逆矩阵。
- 最后再对这个逆矩阵求一次逆,就可以得到视图矩阵。
用代码的方式表示:
function updateCamera(eye, target = [0, 0, 0]) {
	const [x, y, z] = eye;
	// 设置相机初始位置矩阵 m
	const m = new Mat4(
		1, 0,0, 0,
		0, 1, 0, 0,
		0, 0, 1, 0,
		x, y, z, 1,
	);
	const up = [0, 1, 0];
	m.lookAt(eye, target, up).inverse();
	renderer.uniforms.viewMatrix = m;
}
<!DOCTYPE html>
<html lang="en">
    <head>
        <meta charset="UTF-8" />
        <meta http-equiv="X-UA-Compatible" content="IE=edge" />
        <meta name="viewport" content="width=device-width, initial-scale=1.0" />
        <title>在绘制圆柱体里加入相机</title>
        <style>
            canvas {
                border: 1px dashed rgb(250, 128, 114);
            }
        </style>
    </head>
    <body>
        <canvas width="512" height="512"></canvas>
        <script src="./common/lib/gl-renderer.js"></script>
        <script type="module">
            import { Mat4 } from './common/lib/math/Mat4.js';
            import { multiply } from './common/lib/math/functions/Mat4Func.js';
            import { cross, subtract, normalize } from './common/lib/math/functions/Vec3Func.js';
            import { normalFromMat4 } from './common/lib/math/functions/Mat3Func.js';

            const vertex = `
                attribute vec3 a_vertexPosition;
                attribute vec4 color;
                attribute vec3 normal;

                varying vec4 vColor;
                varying float vCos;
                uniform mat4 projectionMatrix;
                uniform mat4 modelMatrix;
                uniform mat4 viewMatrix;
                uniform mat3 normalMatrix;

                const vec3 lightPosition = vec3(1, 0, 0);

                void main() {
                    gl_PointSize = 1.0;
                    vColor = color;
                    vec4 pos =  viewMatrix * modelMatrix * vec4(a_vertexPosition, 1.0);
                    vec4 lp = viewMatrix * vec4(lightPosition, 1.0);
                    vec3 invLight = lightPosition - pos.xyz;
                    vec3 norm = normalize(normalMatrix * normal);
                    vCos = max(dot(normalize(invLight), norm), 0.0);
                    gl_Position = projectionMatrix * pos;
                }
            `;

            const fragment = `
                #ifdef GL_ES
                precision highp float;
                #endif

                uniform vec4 lightColor;
                varying vec4 vColor;
                varying float vCos;

                void main() {
                    gl_FragColor.rgb = vColor.rgb + vCos * lightColor.a * lightColor.rgb;
                    gl_FragColor.a = vColor.a;
                }
            `;

            const canvas = document.querySelector("canvas");
            // 开启深度检测
            const renderer = new GlRenderer(canvas, {
                depth: true
            });
            const program = renderer.compileSync(fragment, vertex);
            renderer.useProgram(program);

            function cylinder(radius = 1.0, height = 1.0, segments = 30, colorCap = [0, 0, 1, 1], colorSide = [1, 0, 0, 1]) {
                const positions = [];
                const cells = [];
                const color = [];
                const cap = [[0, 0]];
                const h = 0.5 * height;
                const normal = [];

                // 顶和底的圆
                for(let i = 0; i <= segments; i++) {
                    const theta = Math.PI * 2 * i / segments;
                    const p = [radius * Math.cos(theta), radius * Math.sin(theta)];
                    cap.push(p);
                }

                positions.push(...cap.map(([x, y]) => [x, y, -h]));
                normal.push(...cap.map(() => [0, 0, -1]));

                for(let i = 1; i < cap.length - 1; i++) {
                    cells.push([0, i, i + 1]);
                }
                cells.push([0, cap.length - 1, 1]);

                let offset = positions.length;
                positions.push(...cap.map(([x, y]) => [x, y, h]));
                normal.push(...cap.map(() => [0, 0, 1]));

                for(let i = 1; i < cap.length - 1; i++) {
                    cells.push([offset, offset + i, offset + i + 1]);
                }
                cells.push([offset, offset + cap.length - 1, offset + 1]);

                color.push(...positions.map(() => colorCap));

                const tmp1 = [];
                const tmp2 = [];
                // 侧面,这里需要求出侧面的法向量
                offset = positions.length;
                for(let i = 1; i < cap.length; i++) {
                    const a = [...cap[i], h];
                    const b = [...cap[i], -h];
                    const nextIdx = i < cap.length - 1 ? i + 1 : 1;
                    const c = [...cap[nextIdx], -h];
                    const d = [...cap[nextIdx], h];

                    positions.push(a, b, c, d);

                    const norm = [];
                    cross(norm, subtract(tmp1, b, a), subtract(tmp2, c, a));
                    normalize(norm, norm);
                    normal.push(norm, norm, norm, norm); // abcd四个点共面,它们的法向量相同

                    color.push(colorSide, colorSide, colorSide, colorSide);
                    cells.push([offset, offset + 1, offset + 2], [offset, offset + 2, offset + 3]);
                    offset += 4;
                }

                return { positions, cells, color, normal };
            }

            const geometry = cylinder(0.2, 1.0, 400,
                [250/255, 128/255, 114/255, 1], // salmon rgb(250 128 114)
                [46/255, 139/255, 87/255, 1], // seagreen rgb(46 139 87)
            );

            // 将 z 轴坐标方向反转,对应的齐次矩阵如下,转换坐标的齐次矩阵,又被称为投影矩阵(ProjectionMatrix)
            renderer.uniforms.projectionMatrix = [
                1, 0, 0, 0,
                0, 1, 0, 0,
                0, 0, -1, 0,
                0, 0, 0, 1,
            ];

            renderer.uniforms.lightColor = [218/255, 165/255, 32/255, 0.6];// goldenrod rgb(218, 165, 32)

            function updateCamera(eye, target = [0, 0, 0]) {
                const [x, y, z] = eye;
                // 设置相机初始位置矩阵 m
                const m = new Mat4(
                    1, 0,0, 0,
                    0, 1, 0, 0,
                    0, 0, 1, 0,
                    x, y, z, 1,
                );
                const up = [0, 1, 0];
                m.lookAt(eye, target, up).inverse();
                renderer.uniforms.viewMatrix = m;
            }

            // 设置相机位置
            updateCamera([0.5, 0, 0.5]);

            renderer.setMeshData([
                {
                    positions: geometry.positions,
                    attributes: {
                        color: geometry.color,
                        normal: geometry.normal
                    },
                    cells: geometry.cells,
                },
            ]);

            renderer.uniforms.modelMatrix = new Mat4(
                1, 0, 0, 0,
                0, 1, 0, 0,
                0, 0, 1, 0,
                0, 0, 0, 1,
            );

            function update() {
                const modelViewMatrix = multiply([], renderer.uniforms.viewMatrix, renderer.uniforms.modelMatrix);

                renderer.uniforms.modelViewMatrix = modelViewMatrix;
                renderer.uniforms.normalMatrix = normalFromMat4([], modelViewMatrix);
                requestAnimationFrame(update);
            }
            update();

            renderer.render();
        </script>
    </body>
</html>
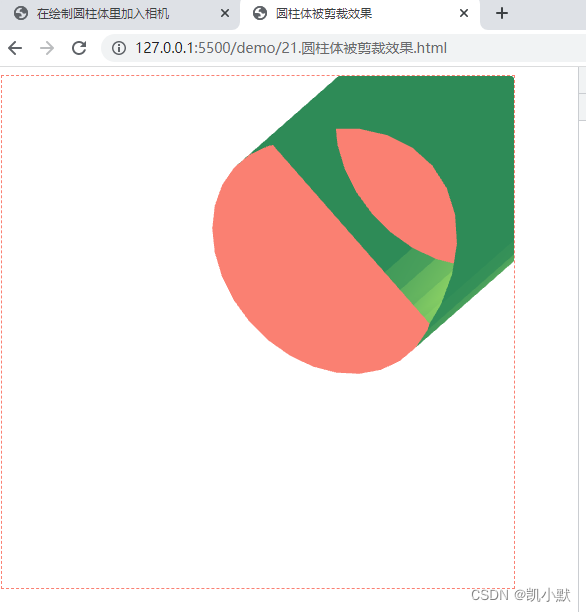
剪裁空间和投影对 3D 图像的影响
WebGL 的默认坐标范围是从 -1 到 1 的。只有当图像的 x、y、z 的值在 -1 到 1 区间内才会被显示在画布上,而在其他位置上的图像都会被剪裁掉。
给下面图形分别给 x、y、z 轴增加 0.5 的平移
<!DOCTYPE html>
<html lang="en">
    <head>
        <meta charset="UTF-8" />
        <meta http-equiv="X-UA-Compatible" content="IE=edge" />
        <meta name="viewport" content="width=device-width, initial-scale=1.0" />
        <title>圆柱体被剪裁效果</title>
        <style>
            canvas {
                border: 1px dashed rgb(250, 128, 114);
            }
        </style>
    </head>
    <body>
        <canvas width="512" height="512"></canvas>
        <script src="./common/lib/gl-renderer.js"></script>
        <script type="module">
            import { multiply } from './common/lib/math/functions/Mat4Func.js';
            import { cross, subtract, normalize } from './common/lib/math/functions/Vec3Func.js';
            import { normalFromMat4 } from './common/lib/math/functions/Mat3Func.js';

            const vertex = `
                attribute vec3 a_vertexPosition;
                attribute vec4 color;
                attribute vec3 normal;

                varying vec4 vColor;
                varying float vCos;
                uniform mat4 projectionMatrix;
                uniform mat4 modelMatrix;
                uniform mat3 normalMatrix;

                const vec3 lightPosition = vec3(1, 0, 0);

                void main() {
                    gl_PointSize = 1.0;
                    vColor = color;
                    vec4 pos =  modelMatrix * vec4(a_vertexPosition, 1.0);
                    vec4 lp = vec4(lightPosition, 1.0);
                    vec3 invLight = lightPosition - pos.xyz;
                    vec3 norm = normalize(normalMatrix * normal);
                    vCos = max(dot(normalize(invLight), norm), 0.0);
                    gl_Position = projectionMatrix * pos;
                }
            `;

            const fragment = `
                #ifdef GL_ES
                precision highp float;
                #endif

                uniform vec4 lightColor;
                varying vec4 vColor;
                varying float vCos;

                void main() {
                    gl_FragColor.rgb = vColor.rgb + vCos * lightColor.a * lightColor.rgb;
                    gl_FragColor.a = vColor.a;
                }
            `;

            const canvas = document.querySelector("canvas");
            // 开启深度检测
            const renderer = new GlRenderer(canvas, {
                depth: true
            });
            const program = renderer.compileSync(fragment, vertex);
            renderer.useProgram(program);

            function cylinder(radius = 1.0, height = 1.0, segments = 30, colorCap = [0, 0, 1, 1], colorSide = [1, 0, 0, 1]) {
                const positions = [];
                const cells = [];
                const color = [];
                const cap = [[0, 0]];
                const h = 0.5 * height;
                const normal = [];

                // 顶和底的圆
                for(let i = 0; i <= segments; i++) {
                    const theta = Math.PI * 2 * i / segments;
                    const p = [radius * Math.cos(theta), radius * Math.sin(theta)];
                    cap.push(p);
                }

                positions.push(...cap.map(([x, y]) => [x, y, -h]));
                normal.push(...cap.map(() => [0, 0, -1]));

                for(let i = 1; i < cap.length - 1; i++) {
                    cells.push([0, i, i + 1]);
                }
                cells.push([0, cap.length - 1, 1]);

                let offset = positions.length;
                positions.push(...cap.map(([x, y]) => [x, y, h]));
                normal.push(...cap.map(() => [0, 0, 1]));

                for(let i = 1; i < cap.length - 1; i++) {
                    cells.push([offset, offset + i, offset + i + 1]);
                }
                cells.push([offset, offset + cap.length - 1, offset + 1]);

                color.push(...positions.map(() => colorCap));

                const tmp1 = [];
                const tmp2 = [];
                // 侧面,这里需要求出侧面的法向量
                offset = positions.length;
                for(let i = 1; i < cap.length; i++) {
                    const a = [...cap[i], h];
                    const b = [...cap[i], -h];
                    const nextIdx = i < cap.length - 1 ? i + 1 : 1;
                    const c = [...cap[nextIdx], -h];
                    const d = [...cap[nextIdx], h];

                    positions.push(a, b, c, d);

                    const norm = [];
                    cross(norm, subtract(tmp1, b, a), subtract(tmp2, c, a));
                    normalize(norm, norm);
                    normal.push(norm, norm, norm, norm); // abcd四个点共面,它们的法向量相同

                    color.push(colorSide, colorSide, colorSide, colorSide);
                    cells.push([offset, offset + 1, offset + 2], [offset, offset + 2, offset + 3]);
                    offset += 4;
                }

                return { positions, cells, color, normal };
            }

            const geometry = cylinder(0.5, 1.0, 30,
                [250/255, 128/255, 114/255, 1], // salmon rgb(250 128 114)
                [46/255, 139/255, 87/255, 1], // seagreen rgb(46 139 87)
            );

            // 将 z 轴坐标方向反转,对应的齐次矩阵如下,转换坐标的齐次矩阵,又被称为投影矩阵(ProjectionMatrix)
            renderer.uniforms.projectionMatrix = [
                1, 0, 0, 0,
                0, 1, 0, 0,
                0, 0, -1, 0,
                0, 0, 0, 1,
            ];

            renderer.uniforms.lightColor = [218/255, 165/255, 32/255, 0.6];// goldenrod rgb(218, 165, 32)

            function fromRotation(rotationX, rotationY, rotationZ) {
                let c = Math.cos(rotationX);
                let s = Math.sin(rotationX);
                const rx = [
                    1, 0, 0, 0,
                    0, c, s, 0,
                    0, -s, c, 0,
                    0, 0, 0, 1,
                ];

                c = Math.cos(rotationY);
                s = Math.sin(rotationY);
                const ry = [
                    c, 0, s, 0,
                    0, 1, 0, 0,
                    -s, 0, c, 0,
                    0, 0, 0, 1,
                ];

                c = Math.cos(rotationZ);
                s = Math.sin(rotationZ);
                const rz = [
                    c, s, 0, 0,
                    -s, c, 0, 0,
                    0, 0, 1, 0,
                    0, 0, 0, 1,
                ];

                const ret = [];
                multiply(ret, rx, ry);
                multiply(ret, ret, rz);

                return ret;
            }

            renderer.setMeshData([
                {
                    positions: geometry.positions,
                    attributes: {
                        color: geometry.color,
                        normal: geometry.normal
                    },
                    cells: geometry.cells,
                },
            ]);

            const rotationX = 0.5;
            const rotationY = 0.5;
            const rotationZ = 0;

            function update() {
                const modelMatrix = fromRotation(rotationX, rotationY, rotationZ);
                modelMatrix[12] = 0.5; // 给 x 轴增加 0.5 的平移
                modelMatrix[13] = 0.5; // 给 y 轴增加 0.5 的平移
                modelMatrix[14] = 0.5; // 给 z 轴增加 0.5 的平移
                renderer.uniforms.modelMatrix = modelMatrix;
                renderer.uniforms.normalMatrix = normalFromMat4([], modelMatrix);
                requestAnimationFrame(update);
            }
            update();

            renderer.render();
        </script>
    </body>
</html>
为了让图形在剪裁空间中正确显示,我们不能只反转 z 轴,还需要将图像从三维空间中投影到剪裁坐标内。
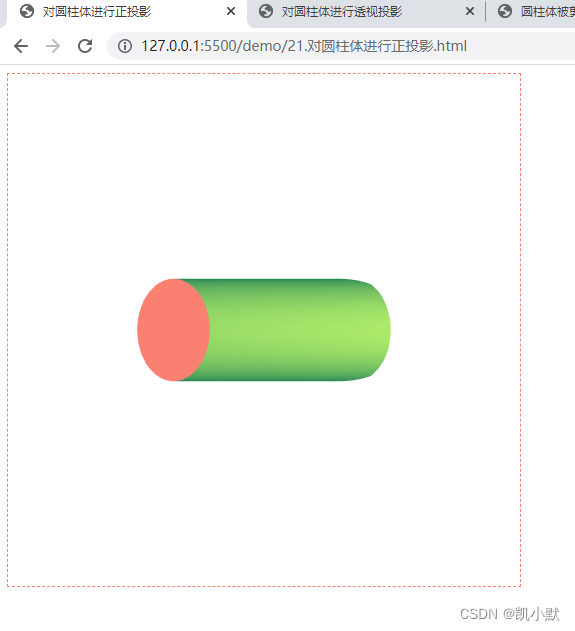
正投影
正投影是将物体投影到一个长方体的空间(又称为视景体),并且无论相机与物体距离多远,投影的大小都不变。正投影又叫做平行投影。

下面 ortho 是计算正投影的函数,它的参数是视景体 x、y、z 三个方向的坐标范围,它的返回值就是投影矩阵。
// 计算正投影矩阵
function ortho(out, left, right, bottom, top, near, far) {
	let lr = 1 / (left - right);
	let bt = 1 / (bottom - top);
	let nf = 1 / (near - far);
	out[0] = -2 * lr;
	out[1] = 0;
	out[2] = 0;
	out[3] = 0;
	out[4] = 0;
	out[5] = -2 * bt;
	out[6] = 0;
	out[7] = 0;
	out[8] = 0;
	out[9] = 0;
	out[10] = 2 * nf;
	out[11] = 0;
	out[12] = (left + right) * lr;
	out[13] = (top + bottom) * bt;
	out[14] = (far + near) * nf;
	out[15] = 1;
	return out;
}
<!DOCTYPE html>
<html lang="en">
    <head>
        <meta charset="UTF-8" />
        <meta http-equiv="X-UA-Compatible" content="IE=edge" />
        <meta name="viewport" content="width=device-width, initial-scale=1.0" />
        <title>对圆柱体进行正投影</title>
        <style>
            canvas {
                border: 1px dashed rgb(250, 128, 114);
            }
        </style>
    </head>
    <body>
        <canvas width="512" height="512"></canvas>
        <script src="./common/lib/gl-renderer.js"></script>
        <script type="module">
            import { Mat4 } from './common/lib/math/Mat4.js';
            import { multiply, ortho } from './common/lib/math/functions/Mat4Func.js';
            import { cross, subtract, normalize } from './common/lib/math/functions/Vec3Func.js';
            import { normalFromMat4 } from './common/lib/math/functions/Mat3Func.js';

            const vertex = `
                attribute vec3 a_vertexPosition;
                attribute vec4 color;
                attribute vec3 normal;

                varying vec4 vColor;
                varying float vCos;
                uniform mat4 projectionMatrix;
                uniform mat4 modelMatrix;
                uniform mat4 viewMatrix;
                uniform mat3 normalMatrix;

                const vec3 lightPosition = vec3(1, 0, 0);

                void main() {
                    gl_PointSize = 1.0;
                    vColor = color;
                    vec4 pos =  viewMatrix * modelMatrix * vec4(a_vertexPosition, 1.0);
                    vec4 lp = viewMatrix * vec4(lightPosition, 1.0);
                    vec3 invLight = lightPosition - pos.xyz;
                    vec3 norm = normalize(normalMatrix * normal);
                    vCos = max(dot(normalize(invLight), norm), 0.0);
                    gl_Position = projectionMatrix * pos;
                }
            `;

            const fragment = `
                #ifdef GL_ES
                precision highp float;
                #endif

                uniform vec4 lightColor;
                varying vec4 vColor;
                varying float vCos;

                void main() {
                    gl_FragColor.rgb = vColor.rgb + vCos * lightColor.a * lightColor.rgb;
                    gl_FragColor.a = vColor.a;
                }
            `;

            const canvas = document.querySelector("canvas");
            // 开启深度检测
            const renderer = new GlRenderer(canvas, {
                depth: true
            });
            const program = renderer.compileSync(fragment, vertex);
            renderer.useProgram(program);

            function cylinder(radius = 1.0, height = 1.0, segments = 30, colorCap = [0, 0, 1, 1], colorSide = [1, 0, 0, 1]) {
                const positions = [];
                const cells = [];
                const color = [];
                const cap = [[0, 0]];
                const h = 0.5 * height;
                const normal = [];

                // 顶和底的圆
                for(let i = 0; i <= segments; i++) {
                    const theta = Math.PI * 2 * i / segments;
                    const p = [radius * Math.cos(theta), radius * Math.sin(theta)];
                    cap.push(p);
                }

                positions.push(...cap.map(([x, y]) => [x, y, -h]));
                normal.push(...cap.map(() => [0, 0, -1]));

                for(let i = 1; i < cap.length - 1; i++) {
                    cells.push([0, i, i + 1]);
                }
                cells.push([0, cap.length - 1, 1]);

                let offset = positions.length;
                positions.push(...cap.map(([x, y]) => [x, y, h]));
                normal.push(...cap.map(() => [0, 0, 1]));

                for(let i = 1; i < cap.length - 1; i++) {
                    cells.push([offset, offset + i, offset + i + 1]);
                }
                cells.push([offset, offset + cap.length - 1, offset + 1]);

                color.push(...positions.map(() => colorCap));

                const tmp1 = [];
                const tmp2 = [];
                // 侧面,这里需要求出侧面的法向量
                offset = positions.length;
                for(let i = 1; i < cap.length; i++) {
                    const a = [...cap[i], h];
                    const b = [...cap[i], -h];
                    const nextIdx = i < cap.length - 1 ? i + 1 : 1;
                    const c = [...cap[nextIdx], -h];
                    const d = [...cap[nextIdx], h];

                    positions.push(a, b, c, d);

                    const norm = [];
                    cross(norm, subtract(tmp1, b, a), subtract(tmp2, c, a));
                    normalize(norm, norm);
                    normal.push(norm, norm, norm, norm); // abcd四个点共面,它们的法向量相同

                    color.push(colorSide, colorSide, colorSide, colorSide);
                    cells.push([offset, offset + 1, offset + 2], [offset, offset + 2, offset + 3]);
                    offset += 4;
                }

                return { positions, cells, color, normal };
            }

            const geometry = cylinder(0.2, 1.0, 400,
                [250/255, 128/255, 114/255, 1], // salmon rgb(250 128 114)
                [46/255, 139/255, 87/255, 1], // seagreen rgb(46 139 87)
            );

            function projection(left, right, bottom, top, near, far) {
                return ortho([], left, right, bottom, top, near, far);
            }

            // 让视景体三个方向的范围都是 (-1, 1)
            const projectionMatrix = projection(-1, 1, -1, 1, -1, 1);
            renderer.uniforms.projectionMatrix = projectionMatrix;

            renderer.uniforms.lightColor = [218/255, 165/255, 32/255, 0.6];// goldenrod rgb(218, 165, 32)

            function updateCamera(eye, target = [0, 0, 0]) {
                const [x, y, z] = eye;
                // 设置相机初始位置矩阵 m
                const m = new Mat4(
                    1, 0,0, 0,
                    0, 1, 0, 0,
                    0, 0, 1, 0,
                    x, y, z, 1,
                );
                const up = [0, 1, 0];
                m.lookAt(eye, target, up).inverse();
                renderer.uniforms.viewMatrix = m;
            }

            // 设置相机位置
            updateCamera([0.5, 0, 0.5]);

            renderer.setMeshData([
                {
                    positions: geometry.positions,
                    attributes: {
                        color: geometry.color,
                        normal: geometry.normal
                    },
                    cells: geometry.cells,
                },
            ]);

            renderer.uniforms.modelMatrix = new Mat4(
                1, 0, 0, 0,
                0, 1, 0, 0,
                0, 0, 1, 0,
                0, 0, 0, 1,
            );

            function update() {
                const modelViewMatrix = multiply([], renderer.uniforms.viewMatrix, renderer.uniforms.modelMatrix);

                renderer.uniforms.modelViewMatrix = modelViewMatrix;
                renderer.uniforms.normalMatrix = normalFromMat4([], modelViewMatrix);
                requestAnimationFrame(update);
            }
            update();

            renderer.render();
        </script>
    </body>
</html>
透视投影
透视投影离相机近的物体大,离相机远的物体小。与正投影不同,正投影的视景体是一个长方体,而透视投影的视景体是一个棱台。
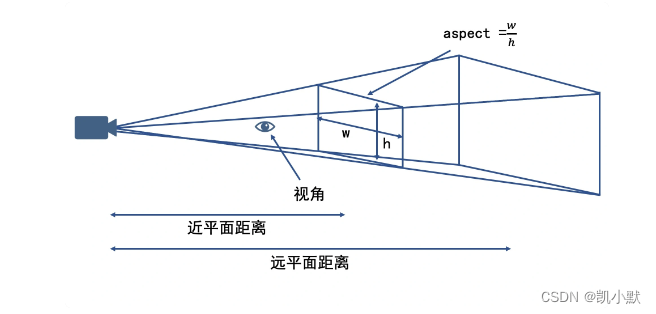
下面 perspective 是计算透视投影的函数,它的参数有近景平面 near、远景平面 far、视角 fovy 和宽高比率 aspect,返回值也是投影矩阵。
// 计算透视投影矩阵
function perspective(out, fovy, aspect, near, far) {
	let f = 1.0 / Math.tan(fovy / 2);
	let nf = 1 / (near - far);
	out[0] = f / aspect;
	out[1] = 0;
	out[2] = 0;
	out[3] = 0;
	out[4] = 0;
	out[5] = f;
	out[6] = 0;
	out[7] = 0;
	out[8] = 0;
	out[9] = 0;
	out[10] = (far + near) * nf;
	out[11] = -1;
	out[12] = 0;
	out[13] = 0;
	out[14] = 2 * far * near * nf;
	out[15] = 0;
	return out;
}
<!DOCTYPE html>
<html lang="en">
    <head>
        <meta charset="UTF-8" />
        <meta http-equiv="X-UA-Compatible" content="IE=edge" />
        <meta name="viewport" content="width=device-width, initial-scale=1.0" />
        <title>对圆柱体进行透视投影</title>
        <style>
            canvas {
                border: 1px dashed rgb(250, 128, 114);
            }
        </style>
    </head>
    <body>
        <canvas width="512" height="512"></canvas>
        <script src="./common/lib/gl-renderer.js"></script>
        <script type="module">
            import { Mat4 } from './common/lib/math/Mat4.js';
            import { multiply, perspective } from './common/lib/math/functions/Mat4Func.js';
            import { cross, subtract, normalize } from './common/lib/math/functions/Vec3Func.js';
            import { normalFromMat4 } from './common/lib/math/functions/Mat3Func.js';

            const vertex = `
                attribute vec3 a_vertexPosition;
                attribute vec4 color;
                attribute vec3 normal;

                varying vec4 vColor;
                varying float vCos;
                uniform mat4 projectionMatrix;
                uniform mat4 modelMatrix;
                uniform mat4 viewMatrix;
                uniform mat3 normalMatrix;

                const vec3 lightPosition = vec3(1, 0, 0);

                void main() {
                    gl_PointSize = 1.0;
                    vColor = color;
                    vec4 pos =  viewMatrix * modelMatrix * vec4(a_vertexPosition, 1.0);
                    vec4 lp = viewMatrix * vec4(lightPosition, 1.0);
                    vec3 invLight = lightPosition - pos.xyz;
                    vec3 norm = normalize(normalMatrix * normal);
                    vCos = max(dot(normalize(invLight), norm), 0.0);
                    gl_Position = projectionMatrix * pos;
                }
            `;

            const fragment = `
                #ifdef GL_ES
                precision highp float;
                #endif

                uniform vec4 lightColor;
                varying vec4 vColor;
                varying float vCos;

                void main() {
                    gl_FragColor.rgb = vColor.rgb + vCos * lightColor.a * lightColor.rgb;
                    gl_FragColor.a = vColor.a;
                }
            `;

            const canvas = document.querySelector("canvas");
            // 开启深度检测
            const renderer = new GlRenderer(canvas, {
                depth: true
            });
            const program = renderer.compileSync(fragment, vertex);
            renderer.useProgram(program);

            function cylinder(radius = 1.0, height = 1.0, segments = 30, colorCap = [0, 0, 1, 1], colorSide = [1, 0, 0, 1]) {
                const positions = [];
                const cells = [];
                const color = [];
                const cap = [[0, 0]];
                const h = 0.5 * height;
                const normal = [];

                // 顶和底的圆
                for(let i = 0; i <= segments; i++) {
                    const theta = Math.PI * 2 * i / segments;
                    const p = [radius * Math.cos(theta), radius * Math.sin(theta)];
                    cap.push(p);
                }

                positions.push(...cap.map(([x, y]) => [x, y, -h]));
                normal.push(...cap.map(() => [0, 0, -1]));

                for(let i = 1; i < cap.length - 1; i++) {
                    cells.push([0, i, i + 1]);
                }
                cells.push([0, cap.length - 1, 1]);

                let offset = positions.length;
                positions.push(...cap.map(([x, y]) => [x, y, h]));
                normal.push(...cap.map(() => [0, 0, 1]));

                for(let i = 1; i < cap.length - 1; i++) {
                    cells.push([offset, offset + i, offset + i + 1]);
                }
                cells.push([offset, offset + cap.length - 1, offset + 1]);

                color.push(...positions.map(() => colorCap));

                const tmp1 = [];
                const tmp2 = [];
                // 侧面,这里需要求出侧面的法向量
                offset = positions.length;
                for(let i = 1; i < cap.length; i++) {
                    const a = [...cap[i], h];
                    const b = [...cap[i], -h];
                    const nextIdx = i < cap.length - 1 ? i + 1 : 1;
                    const c = [...cap[nextIdx], -h];
                    const d = [...cap[nextIdx], h];

                    positions.push(a, b, c, d);

                    const norm = [];
                    cross(norm, subtract(tmp1, b, a), subtract(tmp2, c, a));
                    normalize(norm, norm);
                    normal.push(norm, norm, norm, norm); // abcd四个点共面,它们的法向量相同

                    color.push(colorSide, colorSide, colorSide, colorSide);
                    cells.push([offset, offset + 1, offset + 2], [offset, offset + 2, offset + 3]);
                    offset += 4;
                }

                return { positions, cells, color, normal };
            }

            const geometry = cylinder(0.2, 1.0, 400,
                [250/255, 128/255, 114/255, 1], // salmon rgb(250 128 114)
                [46/255, 139/255, 87/255, 1], // seagreen rgb(46 139 87)
            );

            function projection(near = 0.1, far = 100, fov = 45, aspect = 1) {
                return perspective([], fov * Math.PI / 180, aspect, near, far);
            }

            const projectionMatrix = projection();
            renderer.uniforms.projectionMatrix = projectionMatrix;

            renderer.uniforms.lightColor = [218/255, 165/255, 32/255, 0.6];// goldenrod rgb(218, 165, 32)

            function updateCamera(eye, target = [0, 0, 0]) {
                const [x, y, z] = eye;
                // 设置相机初始位置矩阵 m
                const m = new Mat4(
                    1, 0,0, 0,
                    0, 1, 0, 0,
                    0, 0, 1, 0,
                    x, y, z, 1,
                );
                const up = [0, 1, 0];
                m.lookAt(eye, target, up).inverse();
                renderer.uniforms.viewMatrix = m;
            }

            // 设置相机位置
            updateCamera([1.5, 0, 1.5]);

            renderer.setMeshData([
                {
                    positions: geometry.positions,
                    attributes: {
                        color: geometry.color,
                        normal: geometry.normal
                    },
                    cells: geometry.cells,
                },
            ]);

            renderer.uniforms.modelMatrix = new Mat4(
                1, 0, 0, 0,
                0, 1, 0, 0,
                0, 0, 1, 0,
                0, 0, 0, 1,
            );

            function update() {
                const modelViewMatrix = multiply([], renderer.uniforms.viewMatrix, renderer.uniforms.modelMatrix);

                renderer.uniforms.modelViewMatrix = modelViewMatrix;
                renderer.uniforms.normalMatrix = normalFromMat4([], modelViewMatrix);
                requestAnimationFrame(update);
            }
            update();

            renderer.render();
        </script>
    </body>
</html>
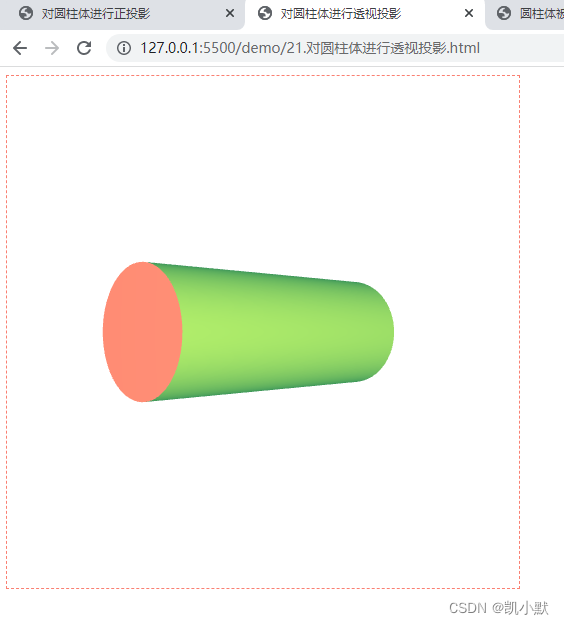
在透视投影下,距离观察者(相机)近的部分大,距离它远的部分小,这更符合真实世界中我们看到的效果。
3D 绘图标准模型
3D 绘图的标准模型也就是3D 绘制几何体的基本数学模型,标准模型一共有四个矩阵,它们分别是:投影矩阵、视图矩阵(ViewMatrix)、模型矩阵(ModelMatrix)、法向量矩阵(NormalMatrix)。
- 前三个矩阵用来计算最终显示的几何体的顶点位置
- 第四个法向量矩阵用来实现光照等效果
比较成熟的图形库,如 ThreeJS、BabylonJS,OGL:轻量级的图形库基本上都是采用这个标准模型来进行 3D 绘图的。
如何使用 OGL 绘制基本的几何体
OGL:https://github.com/oframe/ogl
OGL 是一个小型、高效的 WebGL 库,目标是那些喜欢最小抽象层并有兴趣创建自己的着色器的开发人员。这个 API 是用 es6 模块编写的,没有任何依赖,与 ThreeJS 有很多相似之处,但是它与 WebGL 紧密耦合,而且功能少得多。在其设计中,该库做了必要的最低抽象,因此开发人员仍然可以轻松地将其与原生 WebGL 命令一起使用。保持较低的抽象层次有助于使库更易于理解和扩展,也使它作为 WebGL 学习资源更实用。
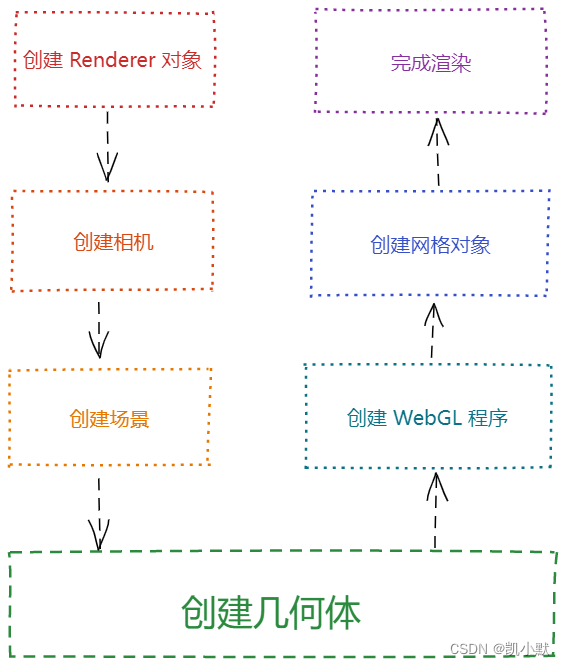
OGL 库绘制几何体分成 7 个步骤:
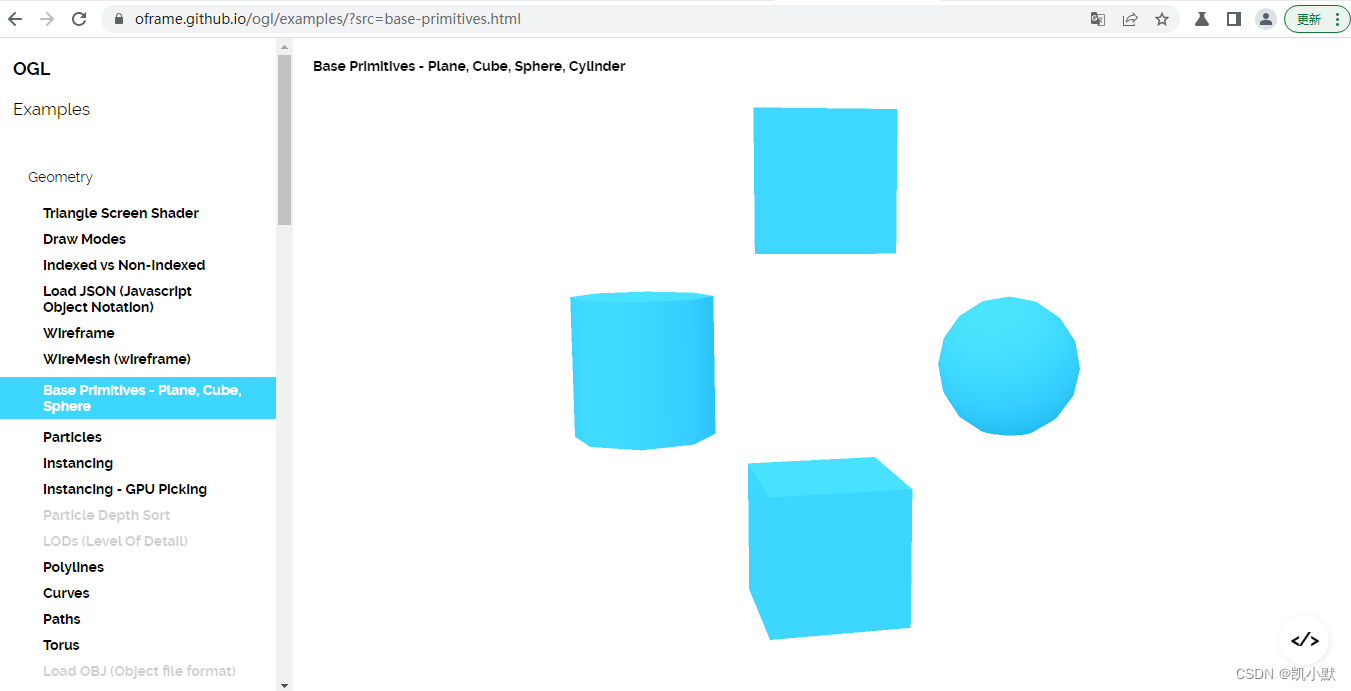
下面我们参考这个 demo 来实操一下:https://oframe.github.io/ogl/examples/?src=base-primitives.html
demo 的源码
<!DOCTYPE html>
<html lang="en">
    <head>
        <meta charset="UTF-8" />
        <meta http-equiv="X-UA-Compatible" content="IE=edge" />
        <meta name="viewport" content="width=device-width, initial-scale=1.0" />
        <title>使用 OGL 绘制基本的几何体</title>
        <style>
            canvas {
                border: 1px dashed rgb(250, 128, 114);
            }
        </style>
    </head>
    <body>
        <canvas width="512" height="512"></canvas>
        <script type="module">
            import { Renderer, Camera, Transform, Plane, Sphere, Box, Cylinder, Torus, Program, Mesh } from './common/lib/ogl/index.mjs';

            // 1、创建 Renderer 对象
            const canvas = document.querySelector('canvas');
            const renderer = new Renderer({
                canvas,
                width: 512,
                height: 512,
                dpr: 2
            });

            const gl = renderer.gl;
            gl.clearColor(1, 1, 1, 1);

            // 2、通过 new Camera 来创建相机(默认创建出的是透视投影相机)
            const camera = new Camera(gl, {
                fov: 35 // 视角设置为 35 度
            });
            // 位置设置为 (0, 1, 7)
            camera.position.set(0, 1, 7);
            // 朝向为 (0, 0, 0)
            camera.lookAt([0, 0, 0]);

            // 3、创建场景
            const scene = new Transform(); // OGL 使用树形渲染的方式,需要使用 Transform 元素,它可以添加子元素和设置几何变换

            // 4、创建几何体对象
            const planeGeometry = new Plane(gl); // 平面
            const sphereGeometry = new Sphere(gl); // 球体
            const cubeGeometry = new Box(gl); // 立方体
            const cylinderGeometry = new Cylinder(gl); // 圆柱
            const torusGeometry = new Torus(gl); // 环面

            // 5、创建 WebGL 程序
            const vertex = `
                attribute vec3 position;
                attribute vec3 normal;
                uniform mat4 modelViewMatrix;
                uniform mat4 projectionMatrix;
                uniform mat3 normalMatrix;
                varying vec3 vNormal;
                void main() {
                    vNormal = normalize(normalMatrix * normal);
                    gl_Position = projectionMatrix * modelViewMatrix * vec4(position, 1.0);
                }
            `;

            const fragment = `
                precision highp float;

                varying vec3 vNormal;
                void main() {
                    vec3 normal = normalize(vNormal);
                    float lighting = dot(normal, normalize(vec3(-0.3, 0.8, 0.6)));
                    gl_FragColor.rgb = vec3(0.98, 0.50, 0.44) + lighting * 0.1;
                    gl_FragColor.a = 1.0;
                }
            `;

            const program = new Program(gl, {
                vertex,
                fragment,
                cullFace: null // 加上能使平面是双面的,不然旋转的时候会有一段空白
            });

            // 6、构建网格(Mesh)元素:设置不同的位置,然后将它们添加到场景 scene 中去
            // 平面
            const plane = new Mesh(gl, {geometry: planeGeometry, program});
            plane.position.set(0, 1.3, 0);
            plane.setParent(scene);
            // 球体
            const sphere = new Mesh(gl, {geometry: sphereGeometry, program});
            sphere.position.set(0, 0, 0);
            sphere.setParent(scene);
            // 立方体
            const cube = new Mesh(gl, {geometry: cubeGeometry, program});
            cube.position.set(0, -1.3, 0);
            cube.setParent(scene);
            // 圆柱
            const cylinder = new Mesh(gl, {geometry: cylinderGeometry, program});
            cylinder.position.set(-1.3, 0, 0);
            cylinder.setParent(scene);
            // 环面
            const torus = new Mesh(gl, {geometry: torusGeometry, program});
            torus.position.set(1.3, 0, 0);
            torus.setParent(scene);

            // 7、完成渲染
            requestAnimationFrame(update);
            function update() {
                requestAnimationFrame(update);

                plane.rotation.x -= 0.02;
                sphere.rotation.y -= 0.03;
                cube.rotation.y -= 0.04;
                cylinder.rotation.z -= 0.02;
                torus.rotation.y -= 0.02;

                renderer.render({scene, camera});
            }
        </script>
    </body>
</html>

下面我们优化一下,让圆看起来更圆,然后这个几个图形的颜色渲染的不一样。
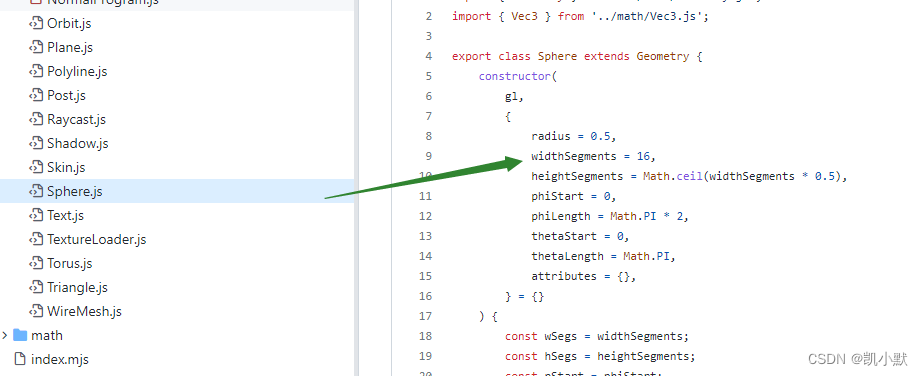
圆可以通过加大参数 widthSegments 处理
颜色问题我们可以通过 Program 传不同颜色到 fragment 里去。
<!DOCTYPE html>
<html lang="en">
    <head>
        <meta charset="UTF-8" />
        <meta http-equiv="X-UA-Compatible" content="IE=edge" />
        <meta name="viewport" content="width=device-width, initial-scale=1.0" />
        <title>使用 OGL 绘制基本的几何体2</title>
        <style>
            canvas {
                border: 1px dashed rgb(250, 128, 114);
            }
        </style>
    </head>
    <body>
        <canvas width="512" height="512"></canvas>
        <script type="module">
            import { Renderer, Camera, Transform, Plane, Sphere, Box, Cylinder, Torus, Program, Mesh } from './common/lib/ogl/index.mjs';

            import { Vec3 } from "./common/lib/math/vec3.js";

            // 1、创建 Renderer 对象
            const canvas = document.querySelector('canvas');
            const renderer = new Renderer({
                canvas,
                width: 512,
                height: 512,
                dpr: 2
            });

            const gl = renderer.gl;
            gl.clearColor(1, 1, 1, 1);

            // 2、通过 new Camera 来创建相机(默认创建出的是透视投影相机)
            const camera = new Camera(gl, {
                fov: 35 // 视角设置为 35 度
            });
            // 位置设置为 (0, 1, 7)
            camera.position.set(0, 1, 7);
            // 朝向为 (0, 0, 0)
            camera.lookAt([0, 0, 0]);

            // 3、创建场景
            const scene = new Transform(); // OGL 使用树形渲染的方式,需要使用 Transform 元素,它可以添加子元素和设置几何变换

            // 4、创建几何体对象
            const planeGeometry = new Plane(gl); // 平面
            const sphereGeometry = new Sphere(gl, {
                widthSegments: 400
            }); // 球体
            const cubeGeometry = new Box(gl); // 立方体
            const cylinderGeometry = new Cylinder(gl); // 圆柱
            const torusGeometry = new Torus(gl); // 环面

            // 5、创建 WebGL 程序
            const vertex = `
                attribute vec3 position;
                attribute vec3 normal;
                uniform mat4 modelViewMatrix;
                uniform mat4 projectionMatrix;
                uniform mat3 normalMatrix;
                varying vec3 vNormal;
                void main() {
                    vNormal = normalize(normalMatrix * normal);
                    gl_Position = projectionMatrix * modelViewMatrix * vec4(position, 1.0);
                }
            `;

            const fragment = `
                precision highp float;

                varying vec3 vNormal;
                uniform vec3 uColor;

                void main() {
                    vec3 normal = normalize(vNormal);
                    float lighting = dot(normal, normalize(vec3(-0.3, 0.8, 0.6)));
                    gl_FragColor.rgb = uColor + lighting * 0.1;
                    gl_FragColor.a = 1.0;
                }
            `;

            function createdProgram(r, g, b) {
                return new Program(gl, {
                    vertex,
                    fragment,
                    uniforms:{
                        uColor:{
                            value: new Vec3(r, g, b)
                        }
                    },
                    cullFace: null // 加上能使平面是双面的,不然旋转的时候会有一段空白
                })
            }

            // 6、构建网格(Mesh)元素:设置不同的位置,然后将它们添加到场景 scene 中去
            // 平面
            const plane = new Mesh(gl, {
                geometry: planeGeometry,
                program: createdProgram(250/255, 128/255, 114/255) // salmon rgb(250, 128, 114)
            });
            plane.position.set(0, 1.3, 0);
            plane.setParent(scene);
            // 球体
            const sphere = new Mesh(gl, {
                geometry: sphereGeometry,
                program: createdProgram(218/255, 165/255, 32/255) // goldenrod rgb(218, 165, 32)
            });
            sphere.position.set(0, 0, 0);
            sphere.setParent(scene);
            // 立方体
            const cube = new Mesh(gl, {
                geometry: cubeGeometry,
                program: createdProgram(46/255, 139/255, 87/255) // seagreen rgb(46, 139, 87)
            });
            cube.position.set(0, -1.3, 0);
            cube.setParent(scene);
            // 圆柱
            const cylinder = new Mesh(gl, {
                geometry: cylinderGeometry,
                program: createdProgram(135/255, 206/255, 235/255) // skyblue rgb(135, 206, 235)
            });
            cylinder.position.set(-1.3, 0, 0);
            cylinder.setParent(scene);
            // 环面
            const torus = new Mesh(gl, {
                geometry: torusGeometry,
                program: createdProgram(106/255, 90/255, 205/255) // slateblue rgb(106, 90, 205)
            });
            torus.position.set(1.3, 0, 0);
            torus.setParent(scene);

            // 7、完成渲染
            requestAnimationFrame(update);
            function update() {
                requestAnimationFrame(update);

                plane.rotation.x -= 0.02;
                sphere.rotation.y -= 0.03;
                cube.rotation.y -= 0.04;
                cylinder.rotation.z -= 0.02;
                torus.rotation.y -= 0.02;

                renderer.render({scene, camera});
            }
        </script>
    </body>
</html>


![[附源码]java毕业设计家政管理系统](https://img-blog.csdnimg.cn/7974e7b386484953a749d1f17e36afcb.png)