文章目录
- 1、简介
- 1.1 Node
- 1.2 WebSocket
- 1.3 Protobuf
- 2、安装
- 2.1 Node
- 2.2 WebSocket
- 2.2.1 nodejs-websocket
- 2.2.2 ws
- 2.3 Protobuf
- 3、代码测试
- 3.1 例子1:websocket(html)
- 3.1.1 客户端:yxy_wsclient1.html
- 3.1.2 客户端:yxy_wsclient1_2.html
- 3.2 例子2:websocket(js)
- 3.2.1 服务端:yxy_wsserver2.js
- 3.2.2 客户端:yxy_wsclient2.js
- 3.3 例子3:websocket(js+html)
- 3.3.1 服务端:yxy_wsserver3.js
- 3.3.2 客户端:yxy_wsclient3.html
- 3.3.3 客户端:yxy_wsclient3_2.html
- 3.3.4 客户端:yxy_wsclient3_3.html
- 3.4 例子4:websocket(js+proto)
- 3.4.1 服务端:yxy_wsserver4.js
- 3.4.2 客户端:yxy_wsclient4.js
- 3.5 例子5:websocket(js+express)
- 3.5.1 服务端:yxy_wsserver5.js
- 3.5.2 客户端:yxy_wsclient5.html
- 结语
1、简介
1.1 Node
Node.js发布于2009年5月,由Ryan Dahl开发,是一个基于Chrome V8引擎的JavaScript运行环境,使用了一个事件驱动、非阻塞式I/O模型,让JavaScript 运行在服务端的开发平台,它让JavaScript成为与PHP、Python、Perl、Ruby等服务端语言平起平坐的脚本语言。

简单的说 Node.js 就是运行在服务端的 JavaScript。
Node.js 是一个基于 Chrome JavaScript 运行时建立的一个平台。
Node.js 是一个事件驱动 I/O 服务端 JavaScript 环境,基于 Google 的 V8 引擎,V8 引擎执行 Javascript 的速度非常快,性能非常好。
1.2 WebSocket
https://developer.mozilla.org/zh-CN/docs/Web/API/WebSocket
WebSocket是一个长连接,客户端可以给服务端发送消息,服务端也可以给客户端发送消息,这便是全双工通信。
WebSocket是html5规范中的一个部分,它借鉴了socket这种思想,为web应用程序客户端和服务端之间(注意是客户端服务端)提供了一种全双工通信机制。同时,它又是一种新的应用层协议,WebSocket协议是为了提供web应用程序和服务端全双工通信而专门制定的一种应用层协议,通常它表示为:ws://echo.websocket.org/?encoding=text HTTP/1.1。通俗的讲,WebSocket 是一种新的网络通信协议,现在浏览器端很多高级功能都需要用到它。
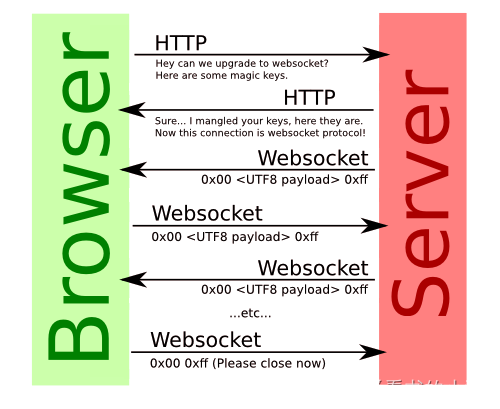
WebSockets 是一种先进的技术。它可以在用户的浏览器和服务器之间打开交互式通信会话。使用此 API,你可以向服务器发送消息并接收事件驱动的响应,而无需通过轮询服务器的方式以获得响应。
WebSocket 是一种网络传输协议,可在单个 TCP 连接上进行全双工通信,位于 OSI 模型的应用层。WebSocket 协议在 2011 年由 IETF 标准化为 RFC 6455,后由 RFC 7936 补充规范。
WebSocket 使得客户端和服务器之间的数据交换变得更加简单,允许服务端主动向客户端推送数据。在 WebSocket API 中,浏览器和服务器只需要完成一次握手,两者之间就可以创建持久性的连接,并进行双向数据传输。
1.3 Protobuf
Google Protocol Buffers 是一种轻便高效的结构化数据存储格式,可以用于结构化数据串行化,或者说序列化。它很适合做数据存储或 RPC 数据交换格式。可用于通讯协议、数据存储等领域的语言无关、平台无关、可扩展的序列化结构数据格式。
https://github.com/protocolbuffers/protobuf
Protobuf (Protocol Buffers) 是谷歌开发的一款无关平台,无关语言,可扩展,轻量级高效的序列化结构的数据格式,用于将自定义数据结构序列化成字节流,和将字节流反序列化为数据结构。所以很适合做数据存储和为不同语言,不同应用之间互相通信的数据交换格式,只要实现相同的协议格式,即后缀为proto文件被编译成不同的语言版本,加入各自的项目中,这样不同的语言可以解析其它语言通过Protobuf序列化的数据。

2、安装
2.1 Node
https://nodejs.org/en
2.2 WebSocket
下面给出了WebSocket数据帧的统一格式。
0                   1                   2                   3
 0 1 2 3 4 5 6 7 8 9 0 1 2 3 4 5 6 7 8 9 0 1 2 3 4 5 6 7 8 9 0 1
+-+-+-+-+-------+-+-------------+-------------------------------+
|F|R|R|R| opcode|M| Payload len |    Extended payload length    |
|I|S|S|S|  (4)  |A|     (7)     |             (16/64)           |
|N|V|V|V|       |S|             |   (if payload len==126/127)   |
| |1|2|3|       |K|             |                               |
+-+-+-+-+-------+-+-------------+ - - - - - - - - - - - - - - - +
|     Extended payload length continued, if payload len == 127  |
+ - - - - - - - - - - - - - - - +-------------------------------+
|                               |Masking-key, if MASK set to 1  |
+-------------------------------+-------------------------------+
| Masking-key (continued)       |          Payload Data         |
+-------------------------------- - - - - - - - - - - - - - - - +
:                     Payload Data continued ...                :
+ - - - - - - - - - - - - - - - - - - - - - - - - - - - - - - - +
|                     Payload Data continued ...                |
+---------------------------------------------------------------+
2.2.1 nodejs-websocket
https://www.npmjs.com/package/nodejs-websocket
用于 websocket 服务器和客户端的 nodejs 模块
安装库nodejs-websocket:
npm i nodejs-websocket
查看库nodejs-websocket 的当前本地安装版本:
npm ls nodejs-websocket -g

- 入门示例
var ws = require("nodejs-websocket")

// Scream server example: "hi" -> "HI!!!"
var server = ws.createServer(function (conn) {
    console.log("New connection")
    conn.on("text", function (str) {
        console.log("Received "+str)
        conn.sendText(str.toUpperCase()+"!!!")
    })
    conn.on("close", function (code, reason) {
        console.log("Connection closed")
    })
}).listen(8001)
2.2.2 ws
https://www.npmjs.com/package/ws
ws: a Node.js WebSocket library
ws 是一个简单易用、速度快、经过全面测试的 WebSocket 客户端和 服务器实现。
或者安装库ws:
npm i ws
查看库ws的当前本地安装版本:
npm ls ws -g

2.3 Protobuf
https://github.com/protobufjs/protobuf.js/
Protocol Buffers for JavaScript (& TypeScript).

安装库protobufjs :
npm install protobufjs [--save --save-prefix=~]
npm install protobufjs-cli [--save --save-prefix=~]
查看库protobufjs 的当前本地安装版本:
npm ls protobufjs -g

3、代码测试
3.1 例子1:websocket(html)
3.1.1 客户端:yxy_wsclient1.html
- yxy_wsclient1.html
var ws = new WebSocket("wss://echo.websocket.org");

ws.onopen = function(evt) {
  console.log("Connection open ...");
  ws.send("Hello WebSockets!");
};

ws.onmessage = function(evt) {
  console.log( "Received Message: " + evt.data);
  ws.close();
};

ws.onclose = function(evt) {
  console.log("Connection closed.");
};
3.1.2 客户端:yxy_wsclient1_2.html
- yxy_wsclient1.html
// Create WebSocket connection.
const socket = new WebSocket("ws://localhost:8080");

// Connection opened
socket.addEventListener("open", function (event) {
  socket.send("Hello Server!");
});

// Listen for messages
socket.addEventListener("message", function (event) {
  console.log("Message from server ", event.data);
});
3.2 例子2:websocket(js)
3.2.1 服务端:yxy_wsserver2.js
const WebSocket = require('ws');//引入模块

const wss = new WebSocket.Server({ port: 8080 });//创建一个WebSocketServer的实例,监听端口8080

wss.on('connection', function connection(ws) {
  ws.on('message', function incoming(message) {
    console.log('received: %s', message);
    ws.send('Hi Client');
  });//当收到消息时,在控制台打印出来,并回复一条信息

});
3.2.2 客户端:yxy_wsclient2.js
const WebSocket = require('ws');

const ws = new WebSocket('ws://localhost:8080');

ws.on('open', function open() {
  ws.send('Hi Server');
});//在连接创建完成后发送一条信息

ws.on('message', function incoming(data) {
  console.log(data);
});//当收到消息时,在控制台打印出来
3.3 例子3:websocket(js+html)
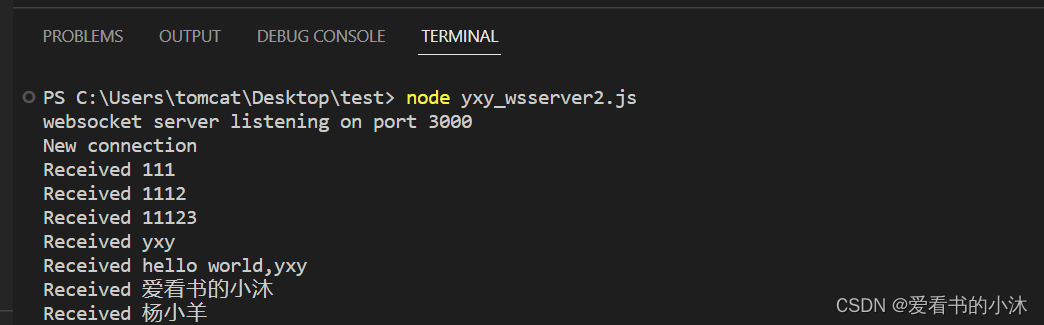
3.3.1 服务端:yxy_wsserver3.js
- yxy_wsserver3.js
var ws = require("nodejs-websocket")
var PORT = 3000

var server = ws.createServer(function (conn) {
	console.log("New connection")
	conn.on("text", function (str) {
		console.log("Received "+str)
		conn.sendText(str.toUpperCase()+"!!!")
	})
	conn.on("close", function (code, reason) {
		console.log("Connection closed")
	})

	conn.on("error",function(err){
		console.log('handler error')
		console.log(err)
	})
}).listen(PORT)

console.log('websocket server listening on port ' + PORT)
- 运行结果如下:
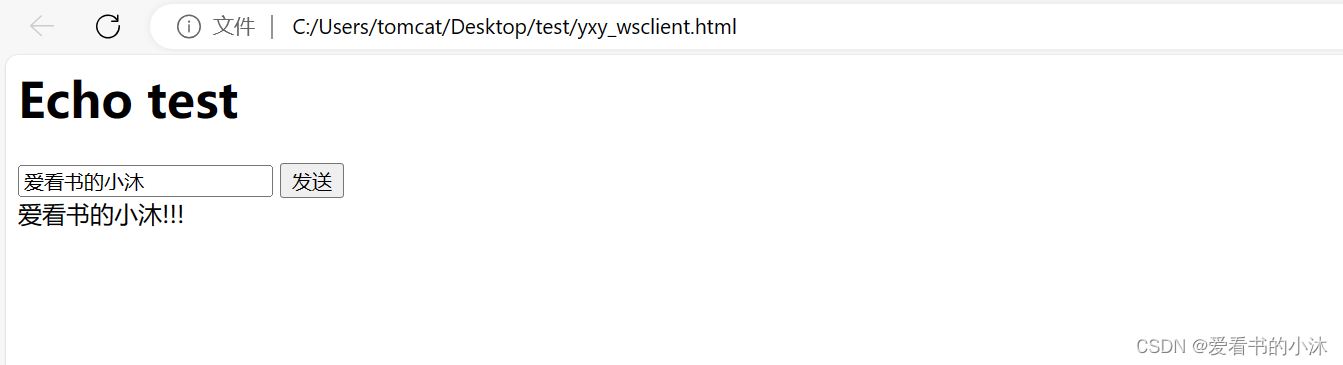
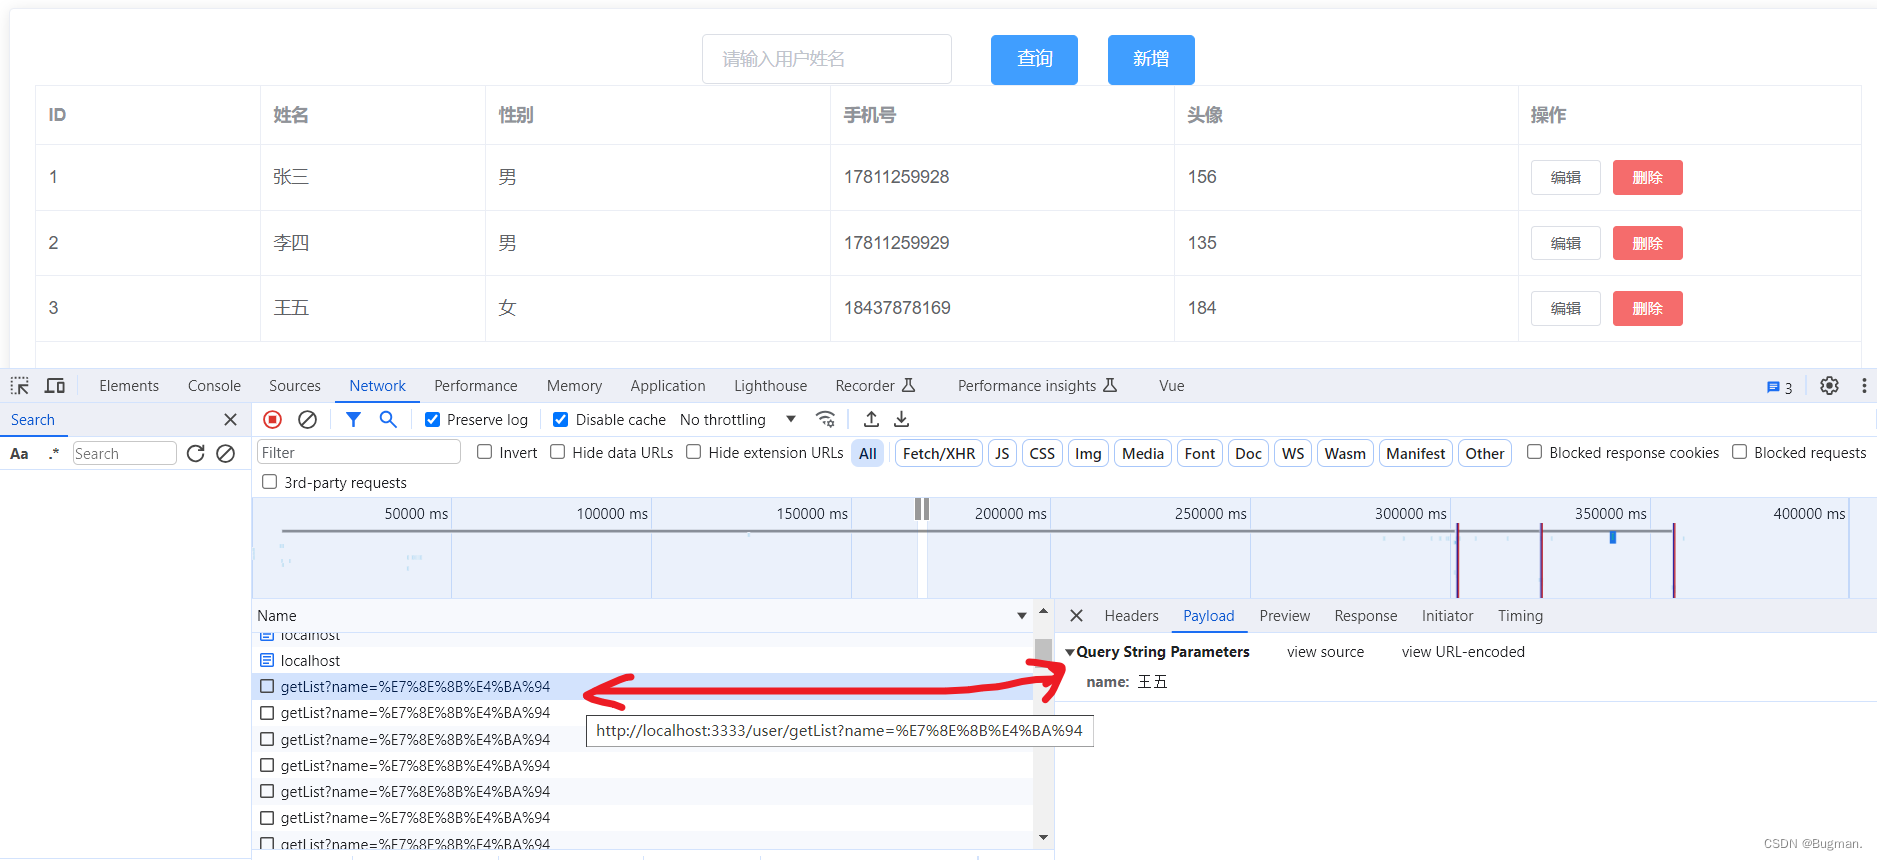
3.3.2 客户端:yxy_wsclient3.html
- yxy_wsclient3.html
<html>
<head>
    <meta charset="utf-8"/>
    <title>websocket</title>
</head>
<body>
    <h1>Echo test</h1>
    <input id="sendTxt" type="text"/>
    <button id="sendBtn">发送</button>
    <div id="recv"></div>
    <script type="text/javascript">
        // var websocket = new WebSocket("ws://echo.websocket.org/");
        var websocket = new WebSocket("ws://127.0.0.1:3000");
        websocket.onopen = function(){
            console.log('websocket open');
            document.getElementById('recv').innerHTML = 'Connected';
        }

        websocket.onclose = function(){
            console.log('websocket close');
        }

        websocket.onmessage = function(event){
            console.log(event.data);
            document.getElementById('recv').innerHTML = event.data;
        }

        document.getElementById('sendBtn').onclick = function(){
            var txt = document.getElementById('sendTxt').value;
            websocket.send(txt);

        }
    </script>
</body>
- 运行结果如下:
3.3.3 客户端:yxy_wsclient3_2.html
- yxy_wsclient3_2.html
<!DOCTYPE html>
<html lang="en">
<head>
    <meta charset="UTF-8">
    <meta name="viewport" content="width=device-width, initial-scale=1.0">
    <title>WenSocket</title>
    <style>
        div{
            width: 200px;
            height: 200px;
            border:1px solid;
            margin-top: 5px;
        }
    </style>
</head>
<body>
    <input type="text" placeholder="请输入内容">
    <button>提交</button>
    <div></div>

    <script>
        const input = document.querySelector('input')
        const button = document.querySelector('button')
        const div = document.querySelector('div')

        //创建WebSocket实例
        // const socket = new WebSocket("ws://echo.websocket.org")
        const socket = new WebSocket("ws://127.0.0.1:3000")

        //监听服务是否链接
        socket.addEventListener('open',()=>{
            div.innerHTML = "服务链接成功"
        })
        //button触发点击事件,将input框中的内容发送至websocket
        //查看websocket是否接收到数据:chrome F12打开控制台》Network》WS》echo.websocket.org》messages
        button.addEventListener('click',()=>{
            const value = input.value
            socket.send(value)
        })
        // 将接收到的数据插入到div中
        socket.addEventListener('message',(e)=>{
            console.log(e)
            div.innerHTML = e.data
        })
    </script>
</body>
</html>
- 运行结果如下:
3.3.4 客户端:yxy_wsclient3_3.html
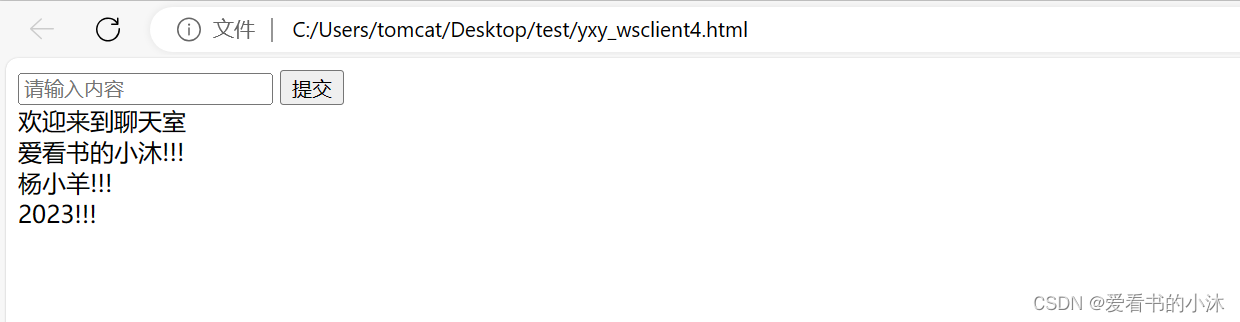
- yxy_wsclient3_3.html
<!DOCTYPE html>
<html lang="en">
<head>
    <meta charset="UTF-8">
    <meta name="viewport" content="width=device-width, initial-scale=1.0">
    <title>WebSocket</title>
    <style>
    </style>
</head>
<body>
    <input type="text" placeholder="请输入内容">
    <button>提交</button>
    <div></div>
    <script>

        const input = document.querySelector('input')
        const button = document.querySelector('button')
        const div = document.querySelector('div')
        const socket = new WebSocket('ws://127.0.0.1:3000')

        socket.addEventListener('open',()=>{
            div.innerText = "欢迎来到聊天室"
        })
        button.addEventListener('click',()=>{
            const value = input.value
            socket.send(value)
            input.value = ''
        })

        socket.addEventListener('message',(e)=>{
            //div.innerText = e.data //这种方法会覆盖原先的数据
            const dv = document.createElement('div')
            dv.innerText = e.data
            div.appendChild(dv)
        })
    </script>
</body>
</html>
3.4 例子4:websocket(js+proto)
WebSocket是HTML5新增的协议,它的目的是在浏览器和服务器之间建立一个不受限的双向通信的通道,比如说,服务器可以在任意时刻发送消息给浏览器。任何一方都可以主动发消息给对方。
HTTP协议是一个请求-响应协议,请求必须先由浏览器发给服务器,服务器才能响应这个请求,再把数据发送给浏览器。换句话说,浏览器不主动请求,服务器是没法主动发数据给浏览器的。
WebSocket并不是全新的协议,而是利用了HTTP协议来建立连接。
安装ws库:
npm i ws
- user.proto
syntax = "proto3";
package yxy;

message Login {
    required string name = 1;
    required string pwd = 2;
}
message Address{
  string province = 1;
  string city = 2;
  string country = 3;
}
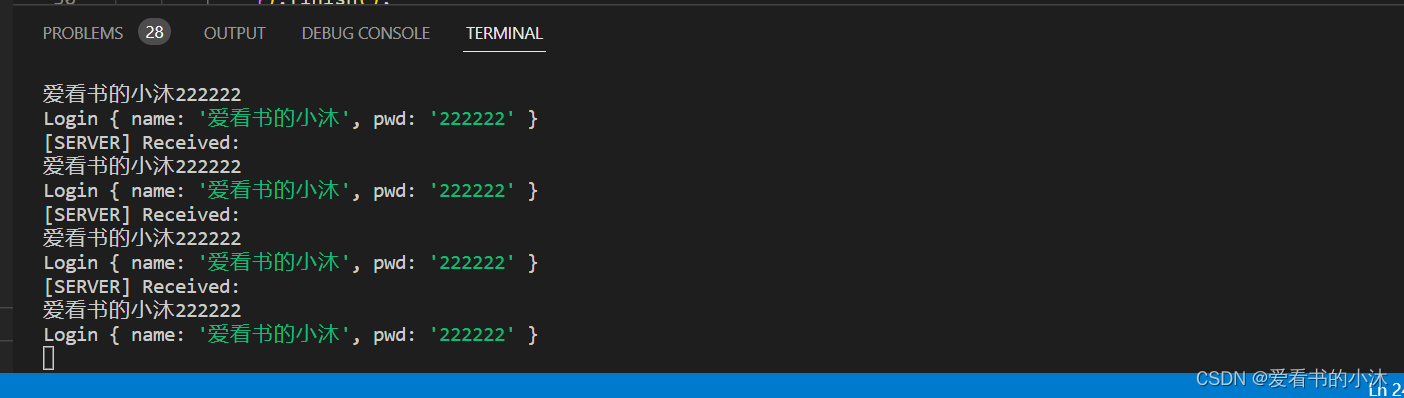
3.4.1 服务端:yxy_wsserver4.js
- yxy_wsserver4.js
const protobuf = require("protobufjs");
const PORT = 3000;
const HOST = '127.0.0.1';

protobuf.load("./user.proto", (err, root) => {
    if (err) throw err;
    const LoginMessage = root.lookupType("yxy.Login");

    const WebSocket = require('ws')
    const WebSocketServer = WebSocket.Server;
    const wss =new WebSocketServer({
        port:PORT
    })

    //如果有WebSocket请求接入,wss对象可以响应connection事件来处理这个WebSocket:
    wss.on('connection',function(ws){  //在connection事件中,回调函数会传入一个WebSocket的实例,表示这个WebSocket连接。
        console.log(`[SERVER] connection()`);
        ws.on('message',function(message){
            console.log(`[SERVER] Received:${message}`);

            // 解码数据
            const payload = LoginMessage.decode(message);
            // 在这里处理消息
            console.log(payload);
            // 编码响应
            const responseData = LoginMessage.encode({
                name: "杨小羊",
                pwd: "111111"
            }).finish();

            const msg = responseData.toString();

            ws.send(`ECHO:${msg}` ,(err)=>{
                if(err){
                    console.log(`[SERVER] error:${err}`);
                }
            })
        })
    })
});
- 运行结果如下:
3.4.2 客户端:yxy_wsclient4.js
- yxy_wsclient4.js
const protobuf = require("protobufjs");
const PORT = 3000;
const HOST = '127.0.0.1';

protobuf.load("./user.proto", (err, root) => {
    if (err) throw err;
    const LoginMessage = root.lookupType("yxy.Login");

    const WebSocket = require('ws')
    let ws = new WebSocket('ws://localhost:3000');

    // 打开WebSocket连接后立刻发送一条消息:
    ws.on('open', function () {
        console.log(`[CLIENT] open()`);
        //每隔一秒向服务器发送消息,以便后面每隔一秒收到消息
        setInterval(function(){
            // 编码数据
            const data = LoginMessage.encode({
                name: "爱看书的小沐",
                pwd: "222222"
            }).finish();

            // 将数据写到连接
            ws.send(data);
            console.log(`[CLIENT] Send: ${data}`);
        },1000)
    });

    // 响应收到的消息:
    ws.on('message', function (message) {
        console.log(`[CLIENT] Received: ${message}`);
        const loginResponse = LoginMessage.decode(message);
        console.log(loginResponse);
    })
});
- 运行结果如下:
3.5 例子5:websocket(js+express)
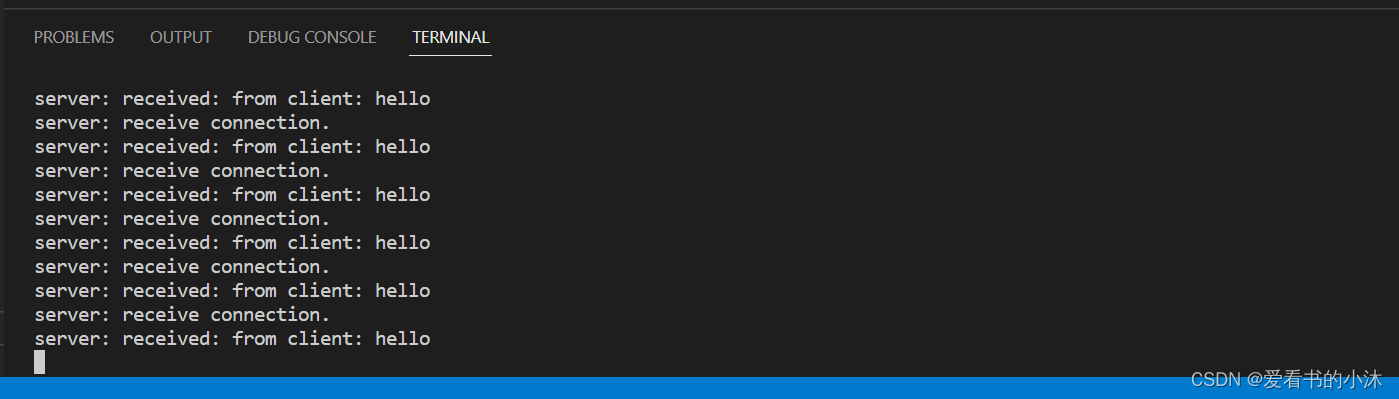
3.5.1 服务端:yxy_wsserver5.js
- yxy_wsserver5.js
var app = require('express')();
var server = require('http').Server(app);
var WebSocket = require('ws');

var wss = new WebSocket.Server({
    port: 8080
});

wss.on('connection', function connection(ws) {
    console.log('server: receive connection.');

    ws.on('message', function incoming(message) {
        console.log('server: received: %s', message);
    });

    ws.send('world');
});

app.get('/', function (req, res) {
    res.sendfile(__dirname + '/index.html');
});

app.listen(3000);
3.5.2 客户端:yxy_wsclient5.html
- yxy_wsclient5.html
<!DOCTYPE html>
<html lang="en">

<head>
    <meta charset="UTF-8">
    <meta name="viewport" content="width=device-width, initial-scale=1.0">
    <title>WebSocket</title>
    <style>
    </style>
</head>

<body>

<script>
    var ws = new WebSocket('ws://localhost:8080');
    ws.onopen = function () {
      console.log('ws onopen');
      ws.send('from client: hello');
    };
    ws.onmessage = function (e) {
      console.log('ws onmessage');
      console.log('from server: ' + e.data);
    };
</script>

</body>
</html>
结语
如果您觉得该方法或代码有一点点用处,可以给作者点个赞,或打赏杯咖啡;╮( ̄▽ ̄)╭
如果您感觉方法或代码不咋地//(ㄒoㄒ)//,就在评论处留言,作者继续改进;o_O???
如果您需要相关功能的代码定制化开发,可以留言私信作者;(✿◡‿◡)
感谢各位大佬童鞋们的支持!( ´ ▽´ )ノ ( ´ ▽´)っ!!!


![2023年中国体育赛事行业现状及趋势分析:体育与科技逐步融合,推动产业高质量发展[图]](https://img-blog.csdnimg.cn/img_convert/2fc2b3f17b2b5ff4d1b90540be97d9f9.png)