Qt5开发及实例V2.0-第八章-Qt模型/视图结构
- 第8章 Qt 5模型/视图结构
- 8.1 概述
- 8.1.1 基本概念
- 8.1.2 【实例】:模型/视图类使用
- 8.2 模型(Model)
- 8.3 视图(View)
- 8.4 代理(Delegate)
- 本章相关例程源码下载
- 1.Qt5开发及实例_CH801.rar 下载
- 2.Qt5开发及实例_CH802.rar 下载
- 3.Qt5开发及实例_CH803.rar 下载
- 4.Qt5开发及实例_CH804.rar 下载
第8章 Qt 5模型/视图结构
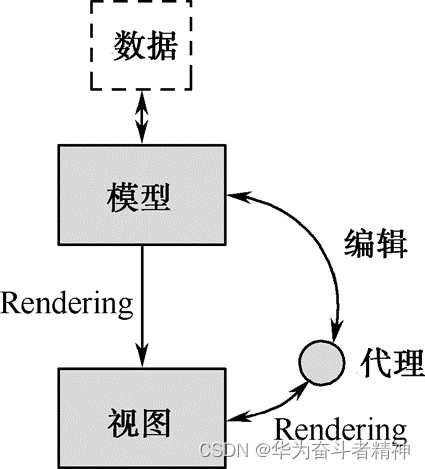
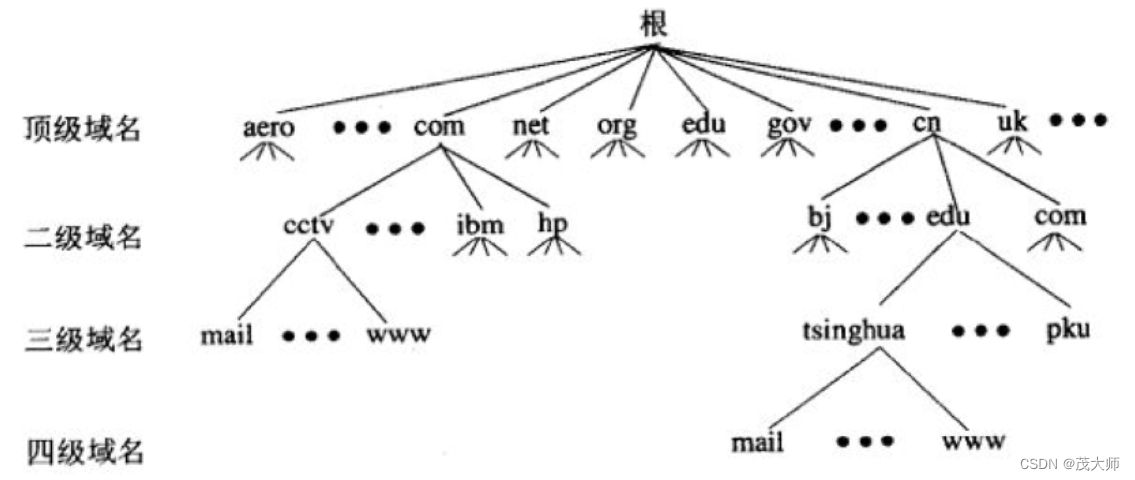
Qt的模型/视图结构分为三部分:模型(Model)、视图(View)和代理(Delegate)。其中,模型与数据源通信,并为其他部件提供接口;而视图从模型中获得用来引用数据条目的模型索引(Model Index)。在视图中,代理负责绘制数据条目,当编辑条目时,代理和模型直接进行通信。模型/视图/代理之间通过信号和槽进行通信,如图8.1所示。
8.1 概述
8.1.1 基本概念
1.模型(Model)
InterView框架中的所有模型都基于抽象基类QAbstractItemModel类,此类由QProxyModel、QAbstractListModel、QAbstractTableModel、QAbstractProxyModel、QDirModel、QFileSystemModel、QHelpContentModel 和 QStandardItemModel类继承。其中,QAbstractListModel类和QAbstractTableModel类是列表和表格模型的抽象基类,如果需要实现列表或表格模型,则应从这两个类继承。完成QStringList存储的QStringListModel继承自QAbstractListModel类,而与数据库有关的QSqlQueryModel类继承自QAbstractTableModel类;QAbstractProxyModel类是代理模型的抽象类;QDirModel类是文件和目录的存储模型。
2.视图(View)
InterView框架中的所有视图都基于抽象基类QAbstractItemView类,此类由QColumnView、QHeaderView、QListView、QTableView和QTreeView类继承。其中,QListView类由QUndoView类和QListWidget类继承;QTableView类由QTableWidget类继承;QTreeView类由QTreeWidget类继承。而QListWidget类、QTableWidget类和QTreeWidget类实际上已经包含了数据,是模型/视图集成在一起的类。
3.代理(Delegate)
InterView框架中的所有代理都基于抽象基类QAbstractItemDelegate类,此类由QItemDelegate 和 QStyledItemDelegate类继承。其中,QItemDelegate类由表示数据库中关系代理的QSqlRelationalDelegate类继承。
8.1.2 【实例】:模型/视图类使用
【例】(简单)(CH801)实现一个简单的文件目录浏览器,完成效果如图8.2所示。
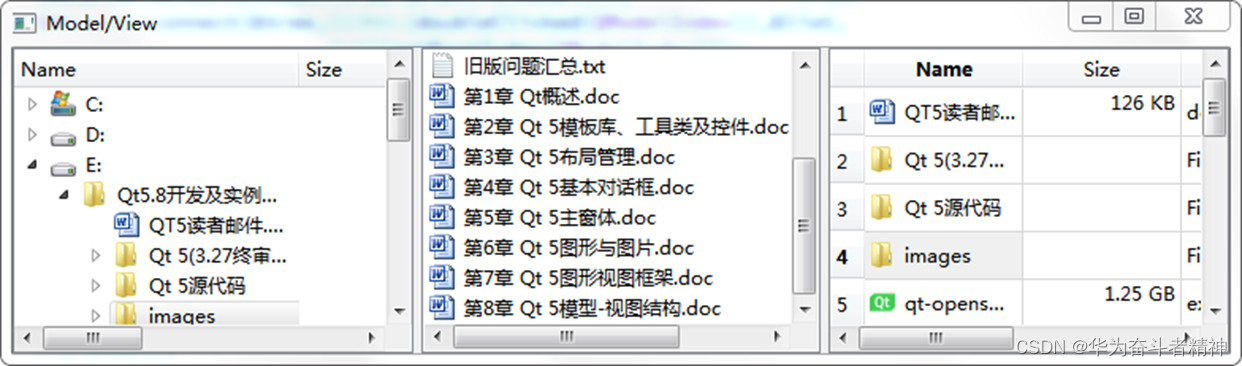
创建工程“DirModeEx.pro”,其源文件“main.cpp”中的具体代码。
其中,
(a) QDirModel model:新建一个QDirModel对象,为数据访问做准备。QDirModel的创建还可以设置过滤器,即只有符合条件的文件或目录才可被访问。
(b) tree.setModel(&model):调用setModel()函数设置View对象的Model为QDirModel对象的model。
© tree.setSelectionMode(QAbstractItemView::MultiSelection):设置QTreeView对象的选择方式为多选。
(d) list.setSelectionModel(tree.selectionModel()):设置QListView对象与QTreeView对象使用相同的选择模型。
(e) table.setSelectionModel(tree.selectionModel()):设置QTableView对象与QTreeView对象使用相同的选择模型。
(f) QObject::connect(&tree,SIGNAL(doubleClicked(QModelIndex)),&list,SLOT(setRoot Index(QModelIndex)))、QObject::connect(&tree,SIGNAL (doubleClicked (QModel Index)), &table,SLOT(setRootIndex(QModelIndex)));:为了实现双击QTreeView对象中的某个目录时,QListView对象和QTableView对象中显示此选定目录下的所有文件和目录,需要连接QTreeView对象的doubleClicked()信号与QListView对象和QTableView对象的setRootIndex()槽函数。
最后运行结果如图8.2所示。
8.2 模型(Model)
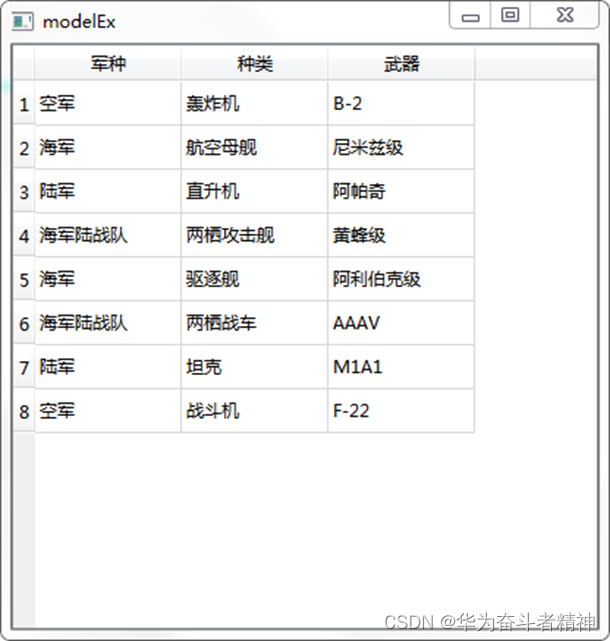
【例】(难度一般)(CH802)通过实现将数值代码转换为文字的模型来介绍如何使用自定义模型。此模型中保存了不同军种的各种武器,实现效果如图8.3所示。
(1)ModelEx类继承自QAbstractTableModel类,头文件“modelex.h”中的具体代码如下:
#include <QAbstractTableModel>
#include <QVector>
#include <QMap>
#include <QStringList>
class ModelEx : public QAbstractTableModel
{
public:
    explicit ModelEx(QObject *parent=0);
    //虚函数声明						//(a)
    virtual int rowCount(const QModelIndex &parent=QModelIndex()) const;
    virtual int columnCount(const QModelIndex &parent=QModelIndex()) const;
    QVariant data(const QModelIndex &index, int role) const;
    QVariant headerData(int section, Qt::Orientation orientation, int role) const;
signals:

public slots:
private:
    QVector<short> army;
    QVector<short> weaponType;
    QMap<short,QString> armyMap;	//使用QMap数据结构保存“数值—文字”的映射
    QMap<short,QString> weaponTypeMap;
    QStringList  weapon;
    QStringList  header;
    void populateModel();			//完成表格数据的初始化填充
};
(2)源文件“modelex.cpp”中的具体代码如下:
#include "modelex.h"
ModelEx::ModelEx(QObject *parent):QAbstractTableModel(parent)
{
    armyMap[1]=tr("空军");
    armyMap[2]=tr("海军");
    armyMap[3]=tr("陆军");
    armyMap[4]=tr("海军陆战队");
    weaponTypeMap[1]=tr("轰炸机");
    weaponTypeMap[2]=tr("战斗机");
    weaponTypeMap[3]=tr("航空母舰");
    weaponTypeMap[4]=tr("驱逐舰");
    weaponTypeMap[5]=tr("直升机");
    weaponTypeMap[6]=tr("坦克");
    weaponTypeMap[7]=tr("两栖攻击舰");
    weaponTypeMap[8]=tr("两栖战车");
    populateModel();
}
populateModel()函数的具体实现代码如下:
void ModelEx::populateModel()
{
    header<<tr("军种")<<tr("种类")<<tr("武器");
    army<<1<<2<<3<<4<<2<<4<<3<<1;
    weaponType<<1<<3<<5<<7<<4<<8<<6<<2;
    weapon<<tr("B-2")<<tr("尼米兹级")<<tr("阿帕奇")<<tr("黄蜂级")
            <<tr("阿利伯克级")<<tr("AAAV")<<tr("M1A1")<<tr("F-22");
}
columnCount()函数中,模型的列固定为“3”,所以直接返回“3”。
int ModelEx::columnCount(const QModelIndex &parent) const
{	 return 3;	   }
rowCount()函数返回模型的行数。
int ModelEx::rowCount(const QModelIndex &parent) const
{
    return army.size();
}
data()函数返回指定索引的数据,即将数值映射为文字。
QVariant ModelEx::data(const QModelIndex &index, int role) const
{
    if(!index.isValid())
        return QVariant();
    if(role==Qt::DisplayRole)				//(a)
    {
        switch(index.column())
        {
        case 0:
            return armyMap[army[index.row()]];
            break;
        case 1:
            return weaponTypeMap[weaponType[index.row()]];
            break;
        case 2:
            return weapon[index.row()];
        default:
            return QVariant();
        }
    }
    return QVariant();
}
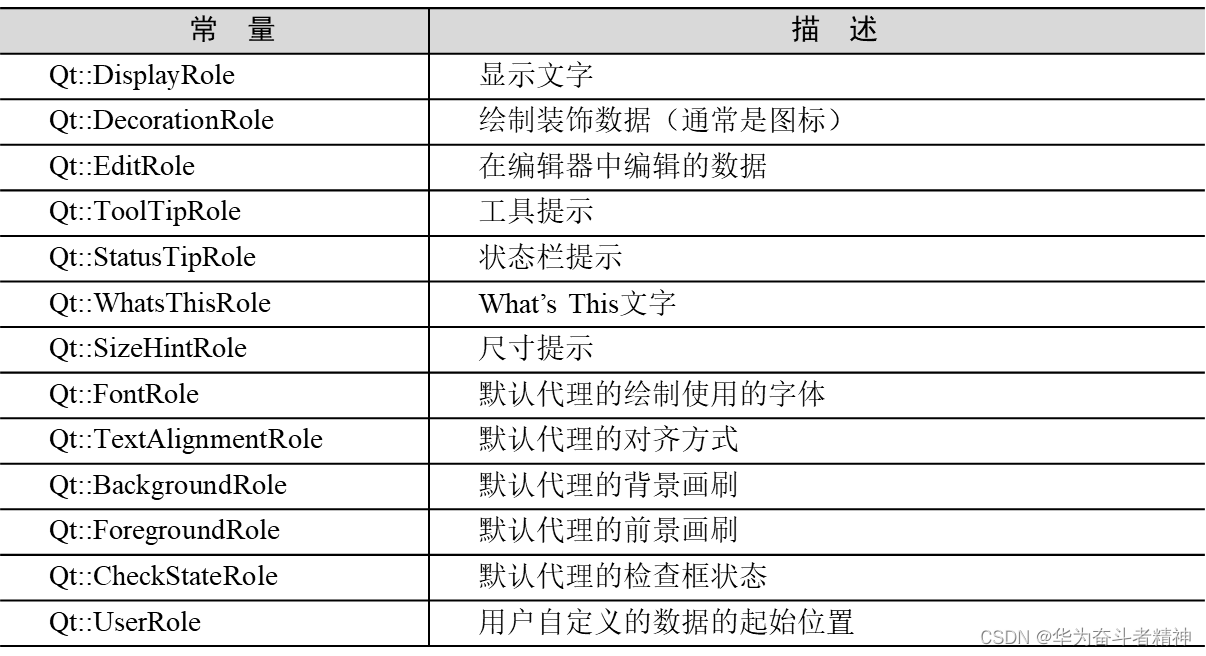
表8.1列出了Item主要的角色及其描述。
headerData()函数返回固定的表头数据,设置水平表头的标题,具体代码如下:
QVariant ModelEx::headerData(int section, Qt::Orientation orientation, int role) const
{
    if(role==Qt::DisplayRole&&orientation==Qt::Horizontal)
           return header[section];
    return QAbstractTableModel::headerData(section,orientation,role);
}
(3)在源文件“main.cpp”中,将模型和视图关联,具体代码如下:
#include <QApplication>
#include "modelex.h"
#include <QTableView>
int main(int argc,char *argv[])
{
    QApplication a(argc,argv);
    ModelEx modelEx;
    QTableView view;
    view.setModel(&modelEx);
    view.setWindowTitle(QObject::tr("modelEx"));
    view.resize(400,400);
    view.show();
    return a.exec();
}
(4)运行结果如图8.3所示。
8.3 视图(View)
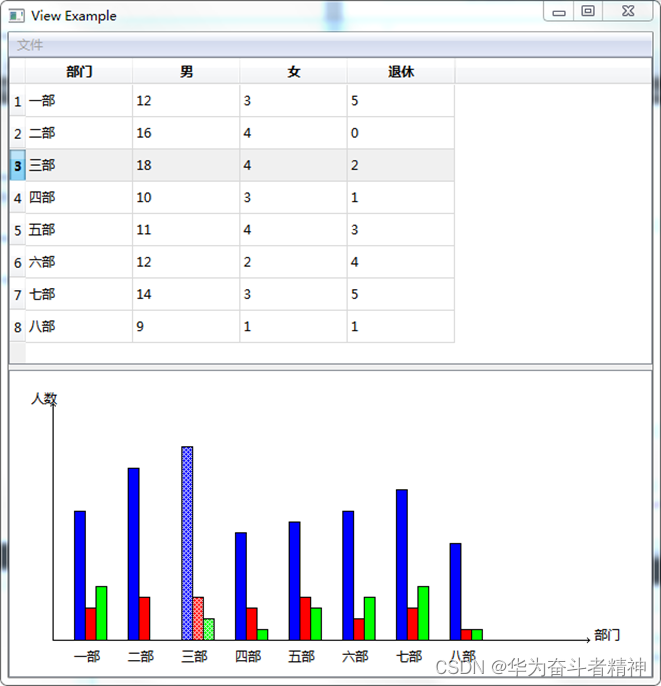
【例】(难度中等)(CH803)通过利用自定义的View,实现一个对TableModel的表格数据进行显示的柱状统计图例子,以此介绍如何应用自定义的View。实现效果如图8.4所示。
(1)完成主窗体,以便显示View的内容。MainWindow 类继承自QMainWindow类,作为主窗体。以下是头文件“mainwindow.h”的具体代码。
(2)下面是源文件“mainwindow.cpp”中的具体代码。
setupModel()函数新建一个Model,并设置表头数据,其具体实现代码如下:
void MainWindow::setupModel()
{
    model = new QStandardItemModel(4,4,this);
    model->setHeaderData(0,Qt::Horizontal,tr("部门"));
    model->setHeaderData(1,Qt::Horizontal,tr("男"));
    model->setHeaderData(2,Qt::Horizontal,tr("女"));
    model->setHeaderData(3,Qt::Horizontal,tr("退休"));
}
setupView()函数的具体实现代码如下:
void MainWindow::setupView()
{
    table = new QTableView;			//新建一个QTableView对象
    table->setModel(model);			//为QTableView对象设置相同的Model
    QItemSelectionModel *selectionModel=new QItemSelectionModel(model);
						//(a)
    table->setSelectionModel(selectionModel);
    connect(selectionModel,SIGNAL(selectionChanged(QItemSelection, ItemSelection)),table,SLOT(selectionChanged(QItemSelection,QItemSelection)));								//(b)
    splitter = new QSplitter;
    splitter->setOrientation(Qt::Vertical);
    splitter->addWidget(table);
    setCentralWidget(splitter);
}
(3)此时,运行效果如图8.5所示。
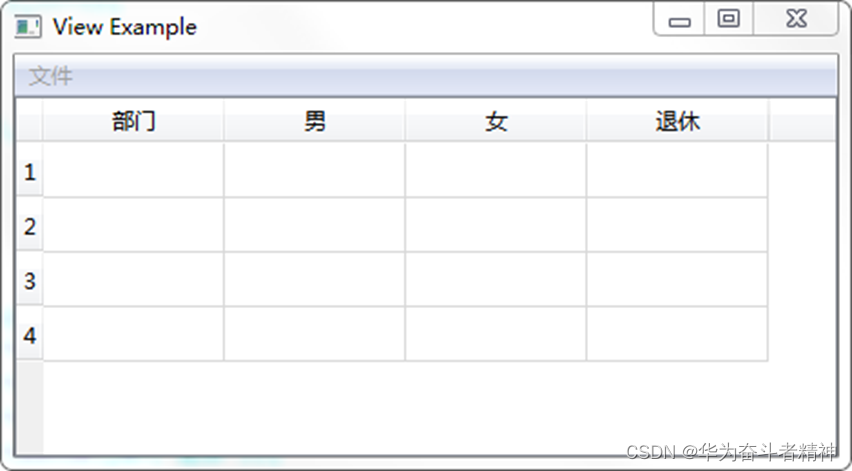
以上只是实现了简单的主窗体框架显示,还没有完成事件。具体实现步骤如下。
(1)在头文件“mainwindow.h”中添加代码如下:
public:
   void openFile(QString);
public slots:
   void slotOpen();
(2)在源文件mainwindow.cpp中添加代码如下:
#include <QFileDialog>
#include <QFile>
#include <QTextStream>
#include <QStringList>
其中,在createAction()函数中添加代码如下:
connect(openAct,SIGNAL(triggered()),this,SLOT(slotOpen()));
槽函数slotOpen()完成打开标准文件对话框,具体代码如下:
void MainWindow::slotOpen()
{
    QString name;
    name = QFileDialog::getOpenFileName(this,"打开",".","histogram files (*.txt)");
    if (!name.isEmpty())
          openFile(name);
}
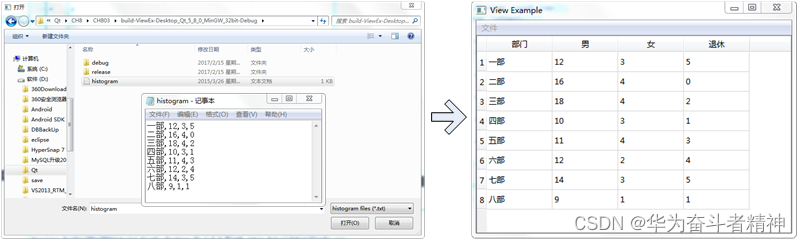
openFile()函数完成打开所选的文件内容,其具体实现代码。
新建一个文本文件,命名为“histogram.txt”,保存在项目D:\Qt\CH8\CH803\build-ViewEx-Desktop_Qt_5_8_0_MinGW_32bit-Debug目录下,文件内容及打开后的效果如图8.6所示。
以上完成了表格数据的加载,下面介绍柱状统计图的绘制。
具体实现步骤如下。
(1)自定义HistogramView类继承自QAbstractItemView类,用于对表格数据进行柱状图显示。下面是头文件“histogramview.h”的具体代码。
其中,
(a) visualRect()、scrollTo()、indexAt()、moveCursor()、horizontalOffset()、verticalOffset()、isIndexHidden()、setSelection()和visualRegionForSelection():QAbstractItemView 类中的纯虚函数。
(b) QModelIndex indexAt(const QPoint &point)const:当鼠标在视图中单击或位置发生改变时被触发,它返回鼠标所在点的QModelIndex值。
© void mousePressEvent(QMouseEvent *event):柱状统计图可以被鼠标单击选择,选中后以不同的方式显示。
(d) void selectionChanged(const QItemSelection &selected,const QItemSelection &deselected):当数据项选择发生变化时,此槽函数将响应。
(e) void dataChanged(const QModelIndex &topLeft,const QModelIndex &bottomRight):当模型中的数据发生变更时,此槽函数将响应。
(f) void setSelection(const QRect &rect,QItemSelectionModel::SelectionFlags flags):将位于QRect内的数据项按照SelectionFlags(描述被选择的数据项以何种方式进行更新)指定的方式进行更新。
(g) QItemSelectionModel *selections:用于保存与视图选择项相关的内容。
(h) QList MRegionList:用于保存其中某一类型柱状图的区域范围,而每个区域是QList中的一个值。
(2)源文件“histogramview.cpp”的具体代码。
其中,
(a) QPainter painter(viewport()):以viewport()作为绘图设备新建一个QPainter对象。
(b) if(selections->isSelected(index)){…} else{…}:使用不同画刷颜色区别选中与未被选中的数据项。
© painter.drawRect(QRect(posM,y0-male10,width,male10)):根据当前数据项的值按比例绘制一个方形表示此数据项。
(d) MRegionList.insert(row,regionM):将此数据所占据的区域保存到MRegionList列表中,为后面的数据项选择做准备。
(e) 从int posF=x0+30语句到posF+=50语句之间的代码段:完成了表格第2列数据的柱状统计图的绘制。
(f) 从int posS=x0+40语句到posS+=50语句之间的代码段:完成了表格第3列数据的柱状统计图的绘制。
dataChanged()函数实现当Model中的数据更改时,调用绘图设备的update()函数进行更新,反映数据的变化。具体实现代码如下:
void HistogramView::dataChanged(const QModelIndex &topLeft,
       const QModelIndex &bottomRight)
{
    QAbstractItemView::dataChanged(topLeft,bottomRight);
    viewport()->update();
}
setSelectionModel()函数为selections赋初值,具体代码如下:
void HistogramView::setSelectionModel(QItemSelectionModel *selectionModel)
{
    selections=selectionModel;
}
(3)下面的工作就是完成对选择项的更新。
selectionChanged()函数中完成当数据项发生变化时调用update()函数,重绘绘图设备即可工作。此函数是将其他View中的操作引起的数据项选择变化反映到自身View的显示中。具体代码如下:
void HistogramView::selectionChanged(const QItemSelection &selected,
      const QItemSelection &deselected)
{
    viewport()->update();
}
鼠标按下事件函数mousePressEvent(),在调用setSelection()函数时确定鼠标单击点是否在某个数据项的区域内,并设置选择项。具体代码如下:
void HistogramView::mousePressEvent(QMouseEvent *event)
{
    QAbstractItemView::mousePressEvent(event);
    setSelection(QRect(event->pos().x(),event->pos().y(),1,1),QItemSelectionModel::SelectCurrent);
}
setSelection()函数的具体代码如下:
void HistogramView::setSelection(const QRect &rect,QItemSelectionModel
::SelectionFlags flags)
{
    int rows = model()->rowCount(rootIndex());		//获取总行数
    int columns = model()->columnCount(rootIndex());	//获取总列数
    QModelIndex selectedIndex;			//(a)
    for(int row=0; row<rows; ++row)			//(b)
    {
        for(int column=1; column<columns; ++column)
        {
            QModelIndex index=model()->index(row,column,rootIndex());
            QRegion region=itemRegion(index);		//(c)
            if(!region.intersected(rect).isEmpty())
                selectedIndex = index;
        }
    }
    if(selectedIndex.isValid())			//(d)
        selections->select(selectedIndex,flags);
    else
    {
        QModelIndex noIndex;
        selections->select(noIndex,flags);
    }
}
indexAt()函数的具体内容。
由于本例未用到以下函数的功能,所以没有实现具体内容,但仍然要写出函数体的框架,代码如下:
QRect HistogramView::visualRect(const QModelIndex &index)const{}
void HistogramView::scrollTo(const QModelIndex &index,ScrollHint){}
QModelIndex HistogramView::moveCursor(QAbstractItemView::CursorAction cursorAction, Qt::KeyboardModifiers modifiers){}
int HistogramView::horizontalOffset()const{}
int HistogramView::verticalOffset()const{}
bool HistogramView::isIndexHidden(const QModelIndex &index)const{}
QRegion HistogramView::visualRegionForSelection(const QItemSelection & selection)const{}
itemRegion()函数的具体代码如下:
QRegion HistogramView::itemRegion(QModelIndex index)
{
    QRegion region;
    if(index.column() == 1)		//男
        region = MRegionList[index.row()];
    if(index.column() == 2)		//女
        region = FRegionList[index.row()];
    if(index.column() == 3)		//退休
        region = SRegionList[index.row()];
    return region;
}
(4)在头文件“mainwindow.h”中添加代码如下:
#include "histogramview.h"
private:
    HistogramView *histogram;
(5)在源文件“mainwindow.cpp”中添加代码,其中,setupView()函数的代码修改。
(6)运行结果如图8.4所示。
8.4 代理(Delegate)
【例】(难度中等)(CH804)利用Delegate设计表格中控件如图8.7所示。

实现步骤如下。
(1)首先,加载表格数据,以便后面的操作。源文件“main.cpp”中的具体代码。
(2)选择“构建”→“构建项目"DateDelegate"”菜单项,首先按照如图8.8所示的格式编辑本例所用的数据文件“test.txt”,保存在项目D:\Qt\CH8\ CH804\build-DateDelegate-Desktop_Qt_5_8_0_MinGW_32bit-Debug目录下,然后运行程序,结果如图8.7所示。

(3)在图8.7中,使用手动的方式实现对生日的录入编辑。下面使用日历编辑框QDateTimeEdit 控件实现对生日的编辑,用自定义的Delegate来实现。
(4)DateDelegate 继承自QItemDelegate类。头文件“datedelegate.h”中的具体代码如下:
#include <QItemDelegate>
class DateDelegate : public QItemDelegate
{
   Q_OBJECT
public:
    DateDelegate(QObject *parent = 0);
    QWidget *createEditor(QWidget *parent, const QStyleOptionViewItem & option, const QModelIndex &index) const;					//(a)
    void setEditorData(QWidget *editor, const QModelIndex &index) const;									//(b)
    void setModelData(QWidget *editor, QAbstractItemModel *model, const QModelIndex &index) const;			  //将Delegate中对数据的改变更新至Model中
    void updateEditorGeometry(QWidget *editor, const QStyleOptionViewItem & option, const QModelIndex &index) const;			//更新控件区的显示
};
(5)源文件“datedelegate.cpp”中的具体代码如下:
#include "datedelegate.h"
#include <QDateTimeEdit>
DateDelegate::DateDelegate(QObject *parent):QItemDelegate(parent)
{
}
createEditor()函数的具体实现代码如下:
QWidget *DateDelegate::createEditor(QWidget *parent,const QStyleOptionViewItem &/*option*/,const QModelIndex &/*index*/) const
{
    QDateTimeEdit *editor = new QDateTimeEdit(parent);	//(a)
    editor->setDisplayFormat("yyyy-MM-dd");			//(b)
    editor->setCalendarPopup(true);				//(c)
    editor->installEventFilter(const_cast<DateDelegate*>(this));
							//(d)
    return editor;
}
setEditorData()函数的具体代码如下:
void DateDelegate::setEditorData(QWidget *editor,
       const QModelIndex &index) const
{
   QString dateStr= index.model()->data(index).toString();		//(a)
   QDate date = QDate::fromString(dateStr,Qt::ISODate);		//(b)
   QDateTimeEdit *edit=static_cast<QDateTimeEdit*>(editor);	//(c)
   edit->setDate(date);								//设置控件的显示数据
}
setModelData()函数的具体代码如下:
void DateDelegate::setModelData(QWidget *editor,QAbstractItemModel *model, const QModelIndex &index) const
{
    QDateTimeEdit *edit=static_cast<QDateTimeEdit*>(editor);	//(a)
    QDate date = edit->date();								 	//(b)
    model->setData(index,QVariant(date.toString(Qt::ISODate)));//(c)
}
updateEditorGeometry()函数的具体代码如下:
void DateDelegate::updateEditorGeometry(QWidget *editor,const QStyleOptionViewItem &option,const QModelIndex &index) const
{
    editor->setGeometry(option.rect);
}
(6)在“main.cpp”文件中添加如下代码:
#include "datedelegate.h"
在语句tableView.setModel(&model);后面添加如下代码:
DateDelegate dateDelegate;
tableView.setItemDelegateForColumn(1,&dateDelegate);
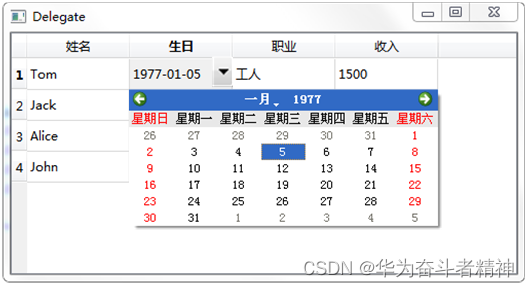
(7)此时运行程序,双击第1行第2列,将显示如图8.9所示的日历编辑框控件。
下面使用下拉列表框QComboBox控件实现对职业类型的输入编辑,使用自定义的Delegate实现。
(1)ComboDelegate继承自QItemDelegate类。
头文件“combodelegate.h”中的具体代码如下:
#include <QItemDelegate>
class ComboDelegate : public QItemDelegate
{
    Q_OBJECT
public:
    ComboDelegate(QObject *parent = 0);
    QWidget *createEditor(QWidget *parent, const QStyleOptionViewItem &option, const QModelIndex	&index) const;
    void setEditorData(QWidget *editor, const QModelIndex &index) const;
    void setModelData(QWidget *editor, QAbstractItemModel *model, const QModelIndex &index) const;
    void updateEditorGeometry(QWidget *editor, const QStyleOptionViewItem &option, const  QModelIndex &index) const;
};
(2)源文件“combodelegate.cpp”中的具体代码如下:
#include "combodelegate.h"
#include <QComboBox>
ComboDelegate::ComboDelegate(QObject *parent):QItemDelegate(parent)
{
}
createEditor()函数中创建了一个QComboBox控件,并插入可显示的条目,安装事件过滤器。具体代码如下:
QWidget *ComboDelegate::createEditor(QWidget *parent,const QStyleOptionViewItem &/*option*/,const QModelIndex &/*index*/) const
{
    QComboBox *editor = new QComboBox(parent);
    editor->addItem("工人");
    editor->addItem("农民");
    editor->addItem("医生");
    editor->addItem("律师");
    editor->addItem("军人");
    editor->installEventFilter(const_cast<ComboDelegate*>(this));
    return editor;
}
setEditorData()函数中更新了Delegate控件中的数据显示,具体代码如下:
void ComboDelegate::setEditorData(QWidget *editor,const QModelIndex &index) const
{
    QString str =index.model()->data(index).toString();
    QComboBox *box = static_cast<QComboBox*>(editor);
    int i=box->findText(str);
    box->setCurrentIndex(i);
}
setModelData()函数中更新了Model中的数据,具体代码如下:
void ComboDelegate::setModelData(QWidget *editor, QAbstractItemModel *model, const QModelIndex &index) const
{
    QComboBox *box = static_cast<QComboBox*>(editor);
    QString str = box->currentText();
    model->setData(index,str);
}
updateEditorGeometry()函数的具体代码如下:
void ComboDelegate::updateEditorGeometry(QWidget *editor,
const QStyleOptionViewItem &option, const QModelIndex &/*index*/) const
{
    editor->setGeometry(option.rect);
}
在“main.cpp”文件中添加以下内容:
#include "combodelegate.h"
在语句tableView.setModel(&model)的后面添加以下代码:
ComboDelegate comboDelegate;
tableView.setItemDelegateForColumn(2,&comboDelegate);
此时运行程序,双击第1行第3列,显示如图8.10所示的下拉列表。

SpinDelegate类的实现与ComboDelegate类的实现类似,此处不再详细讲解。
(1)头文件“spindelegate.h”中的具体代码如下:
#include <QItemDelegate>
class SpinDelegate : public QItemDelegate
{
    Q_OBJECT
public:
    SpinDelegate(QObject *parent = 0);
    QWidget *createEditor(QWidget *parent, const QStyleOptionViewItem &option, const QModelIndex  &index) const;
    void setEditorData(QWidget *editor, const QModelIndex &index) const;
    void setModelData(QWidget *editor, QAbstractItemModel *model, const QModelIndex &index) const;
    void updateEditorGeometry(QWidget *editor, const QStyleOptionViewItem &option, const QModelIndex &index) const;
};
(2)源文件“spindelegate.cpp”中的具体代码如下:
#include "spindelegate.h"
#include <QSpinBox>
SpinDelegate::SpinDelegate(QObject *parent): QItemDelegate(parent)
{
}
createEditor()函数的具体实现代码如下:
QWidget *SpinDelegate::createEditor(QWidget *parent,const QStyleOptionViewItem &/*option*/,const QModelIndex &/*index*/) const
{
    QSpinBox *editor = new QSpinBox(parent);
    editor->setRange(0,10000);
    editor->installEventFilter(const_cast<SpinDelegate*>(this));
    return editor;
}
setEditorData()函数的具体实现代码如下:
void SpinDelegate::setEditorData(QWidget *editor,const QModelIndex &index) const
{
    int value =index.model()->data(index).toInt();
    QSpinBox *box = static_cast<QSpinBox*>(editor);
    box->setValue(value);
}
setModelData()函数的具体实现代码如下:
void SpinDelegate::setModelData(QWidget *editor, QAbstractItemModel *model,const QModelIndex &index) const
{
    QSpinBox *box = static_cast<QSpinBox*>(editor);
    int value = box->value();
    model->setData(index,value);
}
updateEditorGeometry()函数的具体实现代码如下:
void SpinDelegate::updateEditorGeometry(QWidget *editor,
const QStyleOptionViewItem &option, const QModelIndex &/*index*/) const
{
    editor->setGeometry(option.rect);
}
(3)在“main.cpp”文件中添加代码如下:
#include "spindelegate.h"
在语句tableView.setModel(&model)的后面添加内容如下:
SpinDelegate spinDelegate;
tableView.setItemDelegateForColumn(3,&spinDelegate);
(4)此时运行程序,双击第1行第4列后的效果如图8.11所示。

本章相关例程源码下载
1.Qt5开发及实例_CH801.rar 下载
Qt5开发及实例_CH801.rar
2.Qt5开发及实例_CH802.rar 下载
Qt5开发及实例_CH802.rar
3.Qt5开发及实例_CH803.rar 下载
Qt5开发及实例_CH803.rar
4.Qt5开发及实例_CH804.rar 下载
Qt5开发及实例_CH804.rar


![[Linux入门]---文本编辑器vim使用](https://img-blog.csdnimg.cn/c758205b921e4df9ba836edafaef2698.png)