SpingBoot:整合Mybatis-plus+Druid
- 一、特别说明
- 二、创建springboot新工程
- 三、配置
- 3.1 配置pom.xml文件
- 3.2 配置数据源和durid连接池
- 3.3 编写拦截器配置类
- 四、自动生成代码
- 五、测试
- 六、附件-mysql数据库表
本文参考链接:
- [Java] Spring Boot 集成 MyBatis Plus + Druid
- 从0开始springboot后台管理项目-mybatis-plus/druid链接数据库多数据源
- SpingBoot系列教程(一):整合Mybatis-plus+Druid
一、特别说明
MyBatis-PLus的3.0+版本对于LocalDateTime的支持有些差异,对于Druid的版本也有些要求。pom.xml文件里面的俩者的版本是我自己试验过的,可以正常使用,如果自己更换版本,出现LocalDateTime问题,请注意版本问题。
代码生成工具使用的是mybatis-plus-generator,但没有完全按照官方文档来搞,本着能用就行的目的,一些地方与官方有点出入,生成代码之后,还需微调一下,请注意。
数据库文件MySql,末尾我会提供,当然您也可以使用自己的数据库。
回到目录
二、创建springboot新工程
使用IDEA创建springboot工程过程如下:
- file->new -> project -> spring Initializr ->next
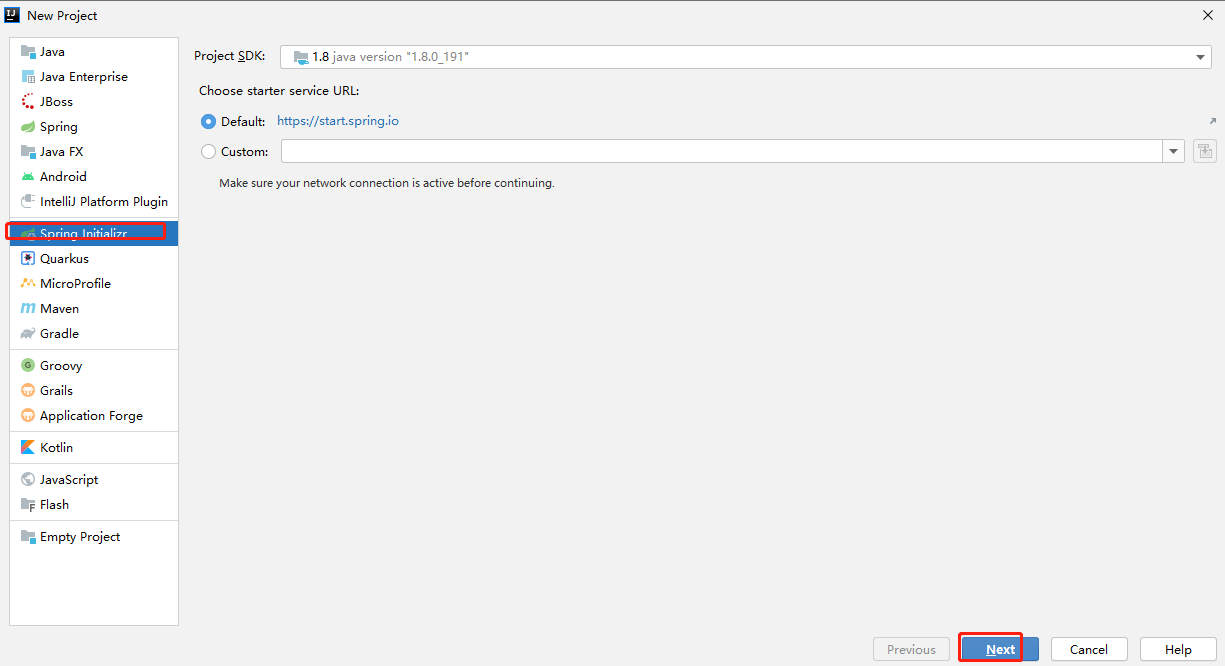
- 输入项目名及包结构:

- 一路选择next,然后点击finish完成创建。
回到目录
三、配置
3.1 配置pom.xml文件
根据自身的springBoot版本和durid、mysql、mybatisplus版本配置,我的配置示例如下:
<?xml version="1.0" encoding="UTF-8"?>
<project xmlns="http://maven.apache.org/POM/4.0.0"
		 xmlns:xsi="http://www.w3.org/2001/XMLSchema-instance"
		 xsi:schemaLocation="http://maven.apache.org/POM/4.0.0 http://maven.apache.org/xsd/maven-4.0.0.xsd">
	<modelVersion>4.0.0</modelVersion>

	<!--    导入springboot版本和框架依赖     -->
	<parent>
		<groupId>org.springframework.boot</groupId>
		<artifactId>spring-boot-starter-parent</artifactId>
		<version>2.5.12</version>
		<relativePath></relativePath>
	</parent>

	<groupId>com.juxin</groupId>
	<artifactId>durid-mybatisplus-demo</artifactId>
	<version>0.0.1-SNAPSHOT</version>
	<name>durid-mybatisplus-demo</name>
	<description>durid与mybatisplus整合实战</description>

	<properties>
		<java.version>1.8</java.version>
		<mybatis-plus.version>3.4.3.1</mybatis-plus.version>
		<druid.version>1.1.21</druid.version>
		<freemarker.version>2.3.29</freemarker.version>
		<!-- 跳过测试 -->
		<skipTests>true</skipTests>
	</properties>

	<dependencies>
		<!-- MySql-->
		<dependency>
			<groupId>mysql</groupId>
			<artifactId>mysql-connector-java</artifactId>
			<scope>runtime</scope>
		</dependency>

		<!--  Druid连接池
        SpringBoot整合druid-spring-boot-starter
        省去配置文件或者@Configuration来配置,直接将配置写在 application.yml
        http://localhost:8081/xxx/druid/index.html
        -->
		<dependency>
			<groupId>com.alibaba</groupId>
			<artifactId>druid-spring-boot-starter</artifactId>
			<version>${druid.version}</version>
		</dependency>

		<!-- mybatis-plus 组件 -->
		<dependency>
			<groupId>com.baomidou</groupId>
			<artifactId>mybatis-plus-boot-starter</artifactId>
			<version>${mybatis-plus.version}</version>
		</dependency>
		<!-- mybatis plus 代码生成器依赖 -->
		<dependency>
			<groupId>com.baomidou</groupId>
			<artifactId>mybatis-plus-generator</artifactId>
			<version>3.5.2</version>
		</dependency>
		<!-- mybatis plus 代码生成器模板,MyBatis-Plus 支持 Velocity(默认)、Freemarker -->
		<dependency>
			<groupId>org.apache.velocity</groupId>
			<artifactId>velocity-engine-core</artifactId>
			<version>2.3</version>
		</dependency>
		<!--Spring Aop-->
		<dependency>
			<groupId>org.springframework.boot</groupId>
			<artifactId>spring-boot-starter-aop</artifactId>
		</dependency>
		<!-- Swagger是一个有用web界面的提供实体模型结构展示,接口展示,调测等的一个工具-->
		<!-- https://mvnrepository.com/artifact/io.springfox/springfox-swagger2 -->
		<dependency>
			<groupId>io.springfox</groupId>
			<artifactId>springfox-swagger2</artifactId>
			<version>2.7.0</version>
		</dependency>
		<!-- https://mvnrepository.com/artifact/io.springfox/springfox-swagger-ui -->
		<dependency>
			<groupId>io.springfox</groupId>
			<artifactId>springfox-swagger-ui</artifactId>
			<version>2.7.0</version>
		</dependency>
		<!-- lombok 省略get/set方法-->
		<dependency>
			<groupId>org.projectlombok</groupId>
			<artifactId>lombok</artifactId>
			<version>RELEASE</version>
			<scope>compile</scope>
		</dependency>
		<dependency>
			<groupId>org.springframework.boot</groupId>
			<artifactId>spring-boot-starter-test</artifactId>
			<scope>test</scope>
		</dependency>
		<dependency>
			<groupId>junit</groupId>
			<artifactId>junit</artifactId>
			<scope>test</scope>
		</dependency>
		<dependency>
			<groupId>org.junit.jupiter</groupId>
			<artifactId>junit-jupiter</artifactId>
			<scope>test</scope>
		</dependency>
		<dependency>
			<groupId>org.springframework</groupId>
			<artifactId>spring-test</artifactId>
			<version>5.3.18</version>
		</dependency>
		<dependency>
			<groupId>org.springframework.boot</groupId>
			<artifactId>spring-boot-starter-web</artifactId>
		</dependency>
	</dependencies>

	<build>
		<plugins>
			<plugin>
				<groupId>org.springframework.boot</groupId>
				<artifactId>spring-boot-maven-plugin</artifactId>
				<configuration>
					<excludes>
						<exclude>
							<groupId>org.projectlombok</groupId>
							<artifactId>lombok</artifactId>
						</exclude>
					</excludes>
				</configuration>
			</plugin>
		</plugins>
		<!--资源文件引用-->
		<resources>
			<resource>
				<directory>src/main/resources</directory>
				<includes>
					<include>**/*.properties</include>
					<include>**/*.yml</include>
					<include>**/*.xml</include>
				</includes>
				<filtering>false</filtering>
			</resource>
		</resources>
	</build>
</project>
回到目录
3.2 配置数据源和durid连接池
修改application.yml文件,示例如下:
#mybatis-plus配置
mybatis-plus:
  configuration:
    #控制台打印sql
    log-impl: org.apache.ibatis.logging.stdout.StdOutImpl

spring:
  #数据源配置
  datasource:
    url: jdbc:mysql://10.20.1.51:3306/rmltest?characterEncoding=utf-8
    username: root
    password: mysql2023
    driver-class-name: com.mysql.jdbc.Driver
    # 数据库访问配置, 使用druid数据源(默认数据源是HikariDataSource)
    type: com.alibaba.druid.pool.DruidDataSource
    # 链接池配置
    druid:
      # 连接池配置:大小,最小,最大
      initial-size: 5
      min-idle: 5
      max-active: 20
      # 连接等待超时时间
      max-wait: 30000
      # 配置检测可以关闭的空闲连接,间隔时间
      time-between-eviction-runs-millis: 60000
      # 配置连接在池中的最小生存时间
      min-evictable-idle-time-millis: 300000
      # 检测连接是否有,有效得select语句
      validation-query: select '1' from dual
      # 申请连接的时候检测,如果空闲时间大于time-between-eviction-runs-millis,执行validationQuery检测连接是否有效,建议配置为true,不影响性能,并且保证安全性。
      test-while-idle: true
      # 申请连接时执行validationQuery检测连接是否有效,建议设置为false,不然会会降低性能
      test-on-borrow: false
      # 归还连接时执行validationQuery检测连接是否有效,建议设置为false,不然会会降低性能
      test-on-return: false
      # 是否缓存preparedStatement,也就是PSCache  官方建议MySQL下建议关闭   个人建议如果想用SQL防火墙 建议打开
      # 打开PSCache,并且指定每个连接上PSCache的大小
      pool-prepared-statements: true
      max-open-prepared-statements: 20
      max-pool-prepared-statement-per-connection-size: 20
      # 配置监控统计拦截的filters, 去掉后监控界面sql无法统计, 'wall'用于防火墙防御sql注入,stat监控统计,logback日志
      filters: stat,wall
      # Spring监控AOP切入点,如x.y.z.service.*,配置多个英文逗号分隔
      #aop-patterns: com.springboot.servie.*
      # lowSqlMillis用来配置SQL慢的标准,执行时间超过slowSqlMillis的就是慢
      connectionProperties: druid.stat.mergeSql=true;druid.stat.slowSqlMillis=5000
      # WebStatFilter监控配置
      web-stat-filter:
        enabled: true
        # 添加过滤规则:那些访问拦截统计
        url-pattern: /*
        # 忽略过滤的格式:哪些不拦截,不统计
        exclusions: '*.js,*.gif,*.jpg,*.png,*.css,*.ico,/druid/*'
      # StatViewServlet配置(Druid监控后台的Servlet映射配置,因为SpringBoot项目没有web.xml所在在这里使用配置文件设置)
      stat-view-servlet:
        enabled: true
        # 配置Servlet的访问路径:访问路径为/druid/**时,跳转到StatViewServlet,会自动转到Druid监控后台
        url-pattern: /druid/*
        # 是否能够重置数据
        reset-enable: false
        # 设置监控后台的访问账户及密码
        login-username: admin
        login-password: 123456
        # IP白名单:允许哪些主机访问,默认为“”任何主机
        # allow: 127.0.0.1
        # IP黑名单:禁止IP访问,(共同存在时,deny优先于allow)
        # deny: 192.168.1.218
      # 配置StatFilter
      filter:
        stat:
          log-slow-sql: true
回到目录
3.3 编写拦截器配置类
定义配置文件类,用于新建拦截器:
配置类内容如下:
package com.juxin.duridmybatisplusdemo.mybatisplus;
import com.baomidou.mybatisplus.annotation.DbType;
import com.baomidou.mybatisplus.extension.plugins.MybatisPlusInterceptor;
import com.baomidou.mybatisplus.extension.plugins.inner.OptimisticLockerInnerInterceptor;
import com.baomidou.mybatisplus.extension.plugins.inner.PaginationInnerInterceptor;
import org.mybatis.spring.annotation.MapperScan;
import org.springframework.context.annotation.Bean;
import org.springframework.context.annotation.Configuration;
import org.springframework.transaction.annotation.EnableTransactionManagement;
/**
 *  MybatisPlusInterceptor是一系列的实现InnerInterceptor的拦截器链,也可以理解为一个集合。
 *  可以包括如下的一些拦截器:
 * (1)自动分页: PaginationInnerInterceptor(最常用)
 * (2)多租户: TenantLineInnerInterceptor
 * (3)动态表名: DynamicTableNameInnerInterceptor
 * (4)乐观锁: OptimisticLockerInnerInterceptor
 * (5)sql性能规范: IllegalSQLInnerInterceptor
 * (6)防止全表更新与删除: BlockAttackInnerInterceptor
 */
@Configuration
@EnableTransactionManagement
@MapperScan("com.juxin.duridmybatisplusdemo.mapper")
class MybatisPlusConfig {
    @Bean
    public MybatisPlusInterceptor mybatisPlusInterceptor() {
        MybatisPlusInterceptor interceptor = new MybatisPlusInterceptor();
        //向Mybatis过滤器中添加分页拦截器
        interceptor.addInnerInterceptor(new PaginationInnerInterceptor(DbType.MYSQL));

        // 乐观锁
        interceptor.addInnerInterceptor(new OptimisticLockerInnerInterceptor());
        return interceptor;
    }
}
回到目录
四、自动生成代码
创建代码生成类,MyBatis-Plus 支持以 Velocity(默认)、Freemarker模式自动生成代码,具体如下:
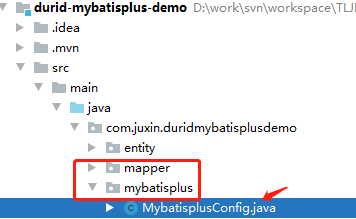
利用mybatis plus代码生成器模板,根据mysql表名等信息自动生成代码,包括:
- 1、表对应的对象实体类,存在entity目录下
- 2、mapper接口文件及xml文件,存在mapper目录下
- 3、service接口及实现类,存在service目录下
- 4、controller类,存在的目录可以自定义
代码自动生成类的代码如下:
package com.juxin.duridmybatisplusdemo.mybatisplus;

import com.baomidou.mybatisplus.annotation.FieldFill;
import com.baomidou.mybatisplus.generator.FastAutoGenerator;
import com.baomidou.mybatisplus.generator.config.DataSourceConfig;
import com.baomidou.mybatisplus.generator.fill.Column;
import org.springframework.util.ClassUtils;
import org.springframework.util.ResourceUtils;
import java.io.File;
import java.io.FileNotFoundException;
import java.io.UnsupportedEncodingException;
import java.net.URL;
import java.net.URLDecoder;
import java.util.*;
/**
 * 利用mybatis plus代码生成器模板,根据mysql表名等信息自动生成代码,
*/
public class MybatisPlusGenerator {
        /// 获取项目路径
        public static void getPath() {
            List<String> paths = new ArrayList<>();
            try {
                //第四种
                String path = ResourceUtils.getURL("classpath:").getPath();
                paths.add("ResourceUtils: " + path);
            } catch (FileNotFoundException e) {
                e.printStackTrace();
            }
            try {
                //第一种
                File path = new File(ResourceUtils.getURL("classpath:").getPath());
                if (!path.exists()) {
                    path = new File("");
                }
                paths.add("File(ResourceUtils): " + path.getAbsolutePath());
                paths.add("File(ResourceUtils): " + path.getPath());
            } catch (FileNotFoundException e) {
                e.printStackTrace();
            }
            //第二种
            String userDir = System.getProperty("user.dir");
            paths.add("user.dir: " + userDir);
            try {
                //第三种
                URL classLoaderResource = ClassUtils.getDefaultClassLoader().getResource("");
                paths.add("ClassLoader: " + classLoaderResource.getPath());
                paths.add("ClassLoader: " + URLDecoder.decode(classLoaderResource.getPath(), "utf-8"));
            } catch (UnsupportedEncodingException e) {
                e.printStackTrace();
            }

//        //第五种  spring boot打jar包,建议使用第五种
//        ApplicationHome applicationHome = new ApplicationHome(getClass());
//        File jarFile = applicationHome.getSource();
//        paths.add("ApplicationHome: " + jarFile.getPath());
//        paths.add("ApplicationHome: " + jarFile.getAbsolutePath());
//        paths.add("ApplicationHome: " + jarFile.getParent());

            //第六种  spring boot打jar包或者不打包,都可以使用的,建议区分系统以完善路径 本种也建议使用
            Properties properties = System.getProperties();
            paths.add("Properties(os.name): " + properties.getProperty("os.name"));
            paths.add("Properties(user.dir): " + properties.getProperty("user.dir"));

            for (String str : paths) {
                System.out.println(str);
            }
        }

        /// 生成代码
        public static void main(String[] args) {
            getPath();

            //mysql配置信息
            String dbUrl = "jdbc:mysql://10.20.1.51:3306/rmltest?useUnicode=true&useSSL=false&characterEncoding=utf-8&serverTimezone=UTC";
            // String driverName = "com.mysql.cj.jdbc.Driver"; // ("com.mysql.jdbc.Driver");
            String dbUsername = "root";
            String dbPassword = "mysql2023";

            String projectPath = System.getProperty("user.dir");//工程目录
            String globalConfigOutputDir = projectPath + "/src/main/java";//包结构
            String globalConfigAuthor = "rml";//作者名
            String packageConfigParent = "com.juxin.duridmybatisplusdemo";//自定义的包结构

            // https://www.mybatis-plus.com/guide/generator-new.html
            DataSourceConfig.Builder dataSourceConfigBuilder = new DataSourceConfig.Builder(dbUrl, dbUsername, dbPassword);
            FastAutoGenerator fastAutoGenerator = FastAutoGenerator.create(dataSourceConfigBuilder);
            fastAutoGenerator
                    .globalConfig(builder -> {
                        builder
                                .enableSwagger() // 开启 swagger 模式
                                .author(globalConfigAuthor)
                                .outputDir(globalConfigOutputDir);
                    })
                    .packageConfig(builder -> {
                        builder.parent(packageConfigParent)
                                .controller("controller");//cotroller文件目录
                    })
                    // 策略配置
                    .strategyConfig((scanner, builder) -> {
                        builder.addInclude(getTables(scanner.apply("请输入表名,多个英文逗号分隔?所有输入 all")))
                                .controllerBuilder() // controller 策略配置
                                .enableRestStyle() // 开启生成@ RestController 控制器
                                .enableHyphenStyle() // 开启驼峰转连字符
                                .entityBuilder() // 实体策略配置
                                .enableLombok() // 开启 lombok 模型
                                .addTableFills(
                                        new Column("create_time", FieldFill.INSERT)
                                ).build();
                    })
                    // 使用Freemarker引擎模板,默认的是Velocity引擎模板
                    //.templateEngine(new FreemarkerTemplateEngine())
                    .execute();
        }
        // 处理 all 情况
        protected static List<String> getTables(String tables) {
            return "all".equals(tables) ? Collections.emptyList() : Arrays.asList(tables.split(","));
        }
}
执行结果查看:
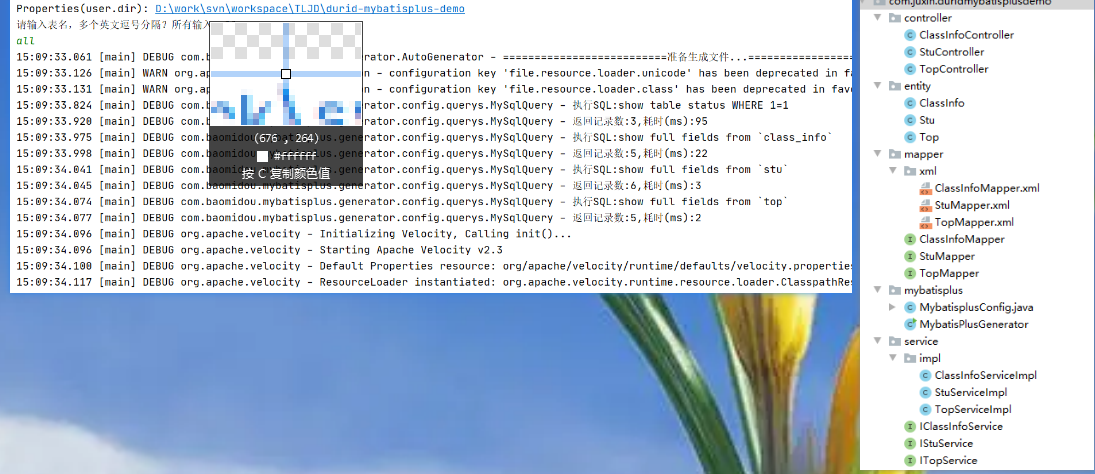
回到目录
五、测试
构建测试用例,以classInfoMapper为例进行测试:
- 在ClassInfoMapper上加上注解@Repository
@Repository它用于将数据访问层 (DAO 层 ) 的类标识为 Spring Bean。具体只需将该注解标注在 DAO类上即可。 同时,为了让 Spring 能够扫描类路径中的类并识别出 @Repository 注解, 需要在 XML 配置文件中启用Bean 的自动扫描功能

2. 在SpringBootTest中构建测试函数,如下所示:
package com.juxin.duridmybatisplusdemo;
import com.juxin.duridmybatisplusdemo.entity.ClassInfo;
import com.juxin.duridmybatisplusdemo.mapper.ClassInfoMapper;
import org.junit.jupiter.api.Test;
import org.mybatis.spring.annotation.MapperScan;
import org.springframework.beans.factory.annotation.Autowired;
import org.springframework.boot.test.context.SpringBootTest;
import java.util.List;
@SpringBootTest
class DuridMybatisplusDemoApplicationTests {
@Autowired
private ClassInfoMapper classInfoMapper;
@Test
void contextLoads() {
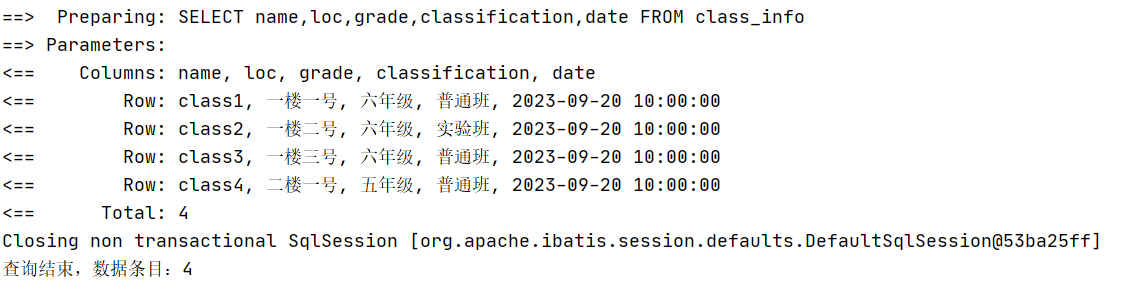
List<ClassInfo> cs = classInfoMapper.selectList(null);
System.out.println("查询结束,数据条目:"+cs.size());
}
}
执行结果如下:
回到目录
六、附件-mysql数据库表
- 表结构:
-- rmltest.class_info definition
CREATE TABLE `class_info` (
  `name` varchar(10) NOT NULL COMMENT '班级名称',
  `loc` varchar(100) DEFAULT NULL COMMENT '所在位置',
  `grade` varchar(100) DEFAULT NULL COMMENT '年级等级:一年级、二年级...',
  `classification` varchar(100) DEFAULT NULL COMMENT '班级分类:普通班、实验班...',
  `date` datetime NOT NULL,
  PRIMARY KEY (`name`)
) ENGINE=InnoDB DEFAULT CHARSET=utf8 COMMENT='班级信息表';
- 数据:
INSERT INTO rmltest.class_info (name,loc,grade,classification,`date`) VALUES
	 ('class1','一楼一号','六年级','普通班','2023-09-20 10:00:00'),
	 ('class2','一楼二号','六年级','实验班','2023-09-20 10:00:00'),
	 ('class3','一楼三号','六年级','普通班','2023-09-20 10:00:00'),
	 ('class4','二楼一号','五年级','普通班','2023-09-20 10:00:00');
回到目录