多线程编程
解决并发访问的问题。
一. 继承 Thread 类实现多线程
1. 继承实现
- 继承thread类
class MyThread extends Thread{} - 覆写run主方法
多线程要执行的功能都应该在run()方法中定义。
class MyThread extends Thread { // 线程的主体类
	private String title;
	public MyThread(String title) {
		this.title = title;
	}
	@Override
	public void run() { // 线程的主体方法
		// TODO Auto-generated method stub
		super.run();
		for(int x = 0; x < 10; x++) {
			System.out.println(this.title + "运行,x = " + x);
		}
	}
}
public class ThreadDemo {

}
- 主程序类之中执行
start()方法
public class ThreadDemo {
	public static void main(String[] args) {
		new MyThread("线程A").start();
		new MyThread("线程B").start();
		new MyThread("线程C").start();
	}
}
2. 源码分析 start() 方法
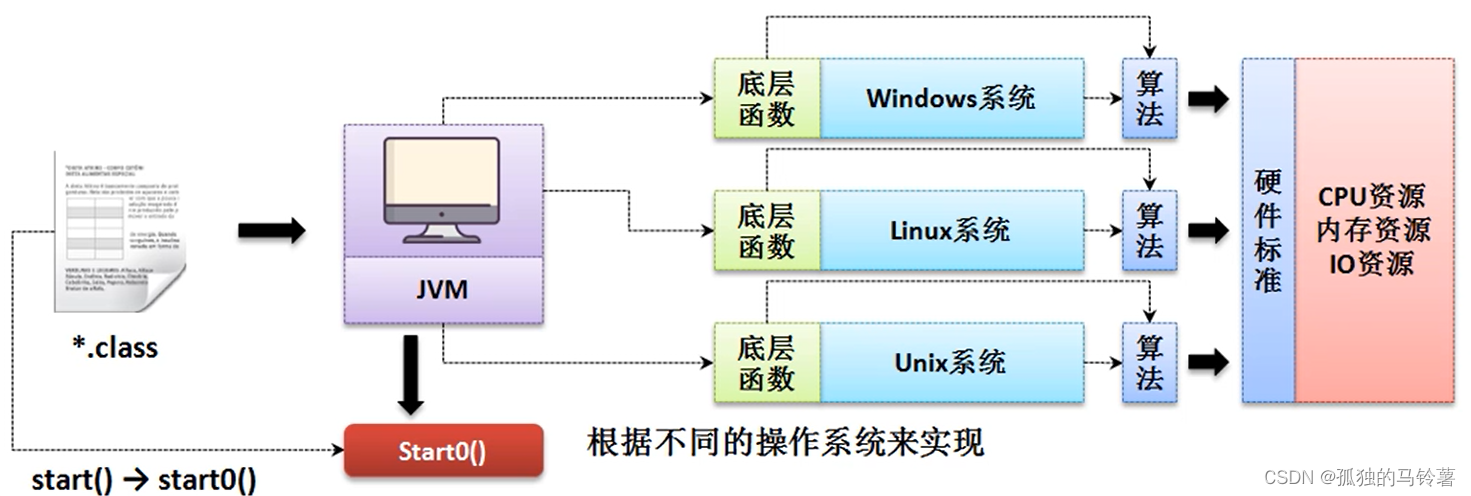
start() 方法实际上执行的是 run() 方法中的内容,而通过观察 Thread类 源码中的start() 方法的源码,我们发现其中调用了如下的一个方法:
private native void start0(); // 只定义了方法名称,但是没有实现
其中,native 指的是 JNI(Java Native Interface)技术,利用这项技术可以使用操作系统提供的一些底层函数进行一些特殊的处理。
而在 Thread 类中的 start0() 方法就表示需要将此方法的实现依赖于不同的操作系统来实现,即其具体实现细节由java虚拟机(JVM)给出。
二. 基于 Runnable 接口实现多线程
1. 原因
继承Thread会有单继承的局限,而使用“基于 Runnable 接口实现多线程”可以克服该局限。
2. 接口源码定义
Runnable 中只有一个 run() 方法,因此是函数式接口,可通过Lambda表达式调用。
@FunctionalInterface
public interface Runnable {
    public abstract void run();
}
3. 接口实现
3.1 正常实现
- 实现 Runnable 接口
class MyThread implements Runnable{} - 覆写
run()方法
class MyThread implements Runnable { // 线程的主体类
	private String title;
	public MyThread(String title) {
		this.title = title;
	}
	@Override
	public void run() { // 线程的主体方法
		for(int x = 0; x < 10; x++) {
			System.out.println(this.title + "运行,x = " + x);
		}
	}
}
- 作为Thread的参数,借用
start()方法
由于 Runnable 接口中并没有start()方法,因此对于多线程的启动仍然需要使用Thread 类针对于 Runnable 的构造方法。
// 源码中 Thread 关于 Runnable 的构造方法
public Thread(Runnable target) {
    this(null, target, "Thread-" + nextThreadNum(), 0);
}
主程序类中的代码为:
public class ThreadDemo {
	public static void main(String[] args) {
		Thread thA = new Thread(new MyThread("线程A"));
		Thread thB = new Thread(new MyThread("线程B"));
		Thread thC = new Thread(new MyThread("线程C"));

		thA.start();
		thB.start();
		thC.start();
	}
}
3.2 利用Lambda实现多进程定义
public class ThreadDemo {
	public static void main(String[] args) {
		for (int x = 0; x < 3; x++) {
			String title = "线程对象:" + x ;
			new Thread(()->{
				for (int y = 0; y < 10; y++) {
					System.out.println(title + "运行,y = " + y);
				}
			}).start();
		}

	}
}
总结: 以后开发之中对于多线程的实现,优先考虑 Runnable 接口实现,并且永恒都是通过Thread 类对象启动多线程。
三. Thread 和 Runnable 关系
1. 隐含的代理设计模式
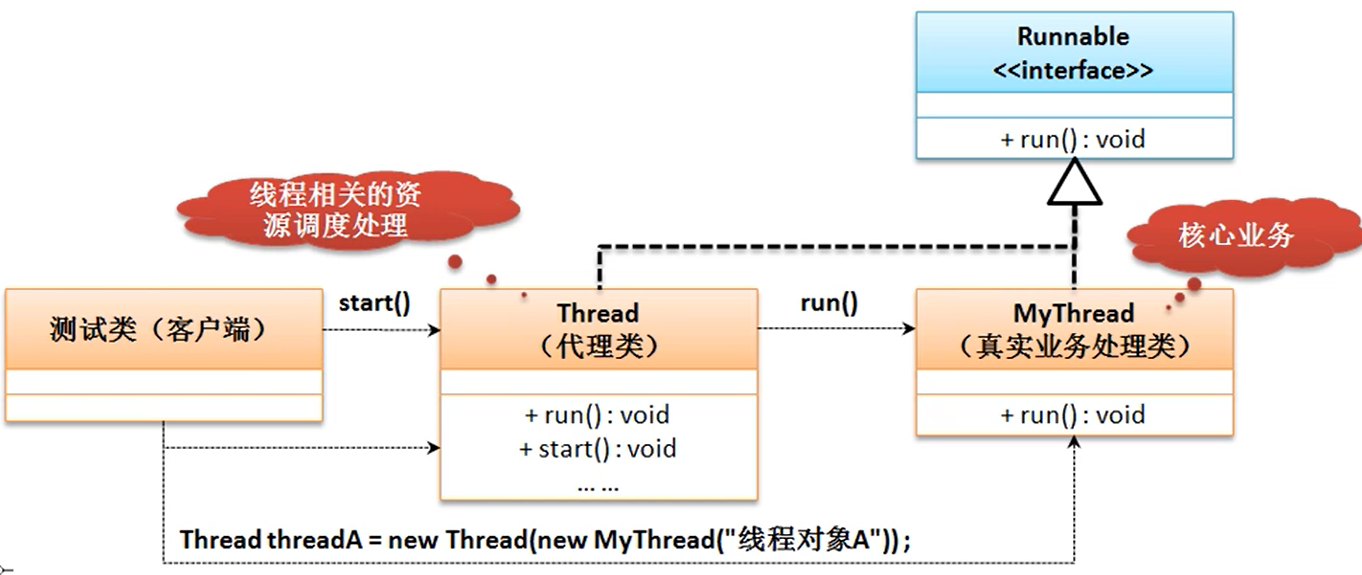
多线程的设计之中,使用了代理设计模式的结构,用户自定义的线程主体只是负责项目核心功能的实现,而所有的辅助实现全部交由 Thread 类来处理。
在进行 Thread 启动多线程的时候调用的是 start()方法,而后找到的是 run() 方法
2. 资源并发访问
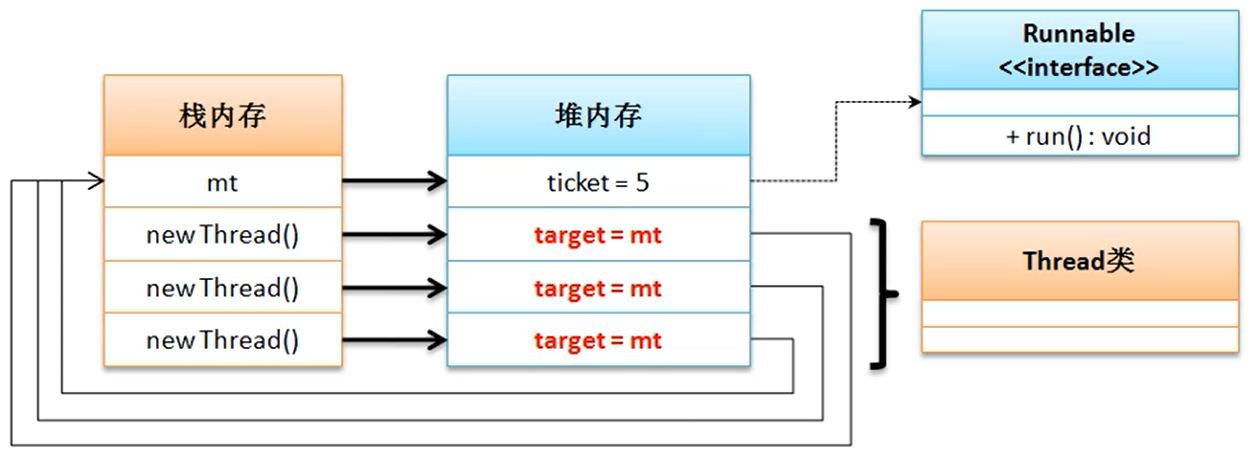
多线程开发的本质就是实现多个线程可以进行同一资源的抢占。Thread描述线程(实际项目中的用户),Runnable描述资源。

范例:利用卖票程序实现多个线程的资源并发访问
class MyThread implements Runnable { // 线程的主体类
	private int ticket = 5;

	@Override
	public void run() { // 线程的主体方法
		for(int x = 0; x < 10; x++) {
			if (this.ticket > 0)
				System.out.println("卖票,ticket = " + this.ticket --);
		}
	}
}
public class ThreadDemo {
	public static void main(String[] args) {
		MyThread mt = new MyThread();
		new Thread(mt).start(); //第一个线程启动
		new Thread(mt).start(); //第二个线程启动,这并不是同一个线程,而是同一个资源
		new Thread(mt).start(); //第三个线程启动,通过 new 实例化了三个线程,三个线程传入的Runnable都是mt

	}
}
四. Callable 接口实现多线程
Runnable 有一个缺点:当线程结束之后无法获得一个返回值,因此使用可返回值的Callable 接口。
1. 接口源码定义
- Callable 也是函数式接口,可通过Lambda表达式调用。
- Callable 其中只有一个
call()方法,返回一个泛型,此泛型的类型就是返回数据的类型,可以避免由于向下转型所带来的安全隐患。
@FunctionalInterface
public interface Callable<V> {
    /**
     * Computes a result, or throws an exception if unable to do so.
     *
     * @return computed result
     * @throws Exception if unable to compute a result
     */
    V call() throws Exception;
}
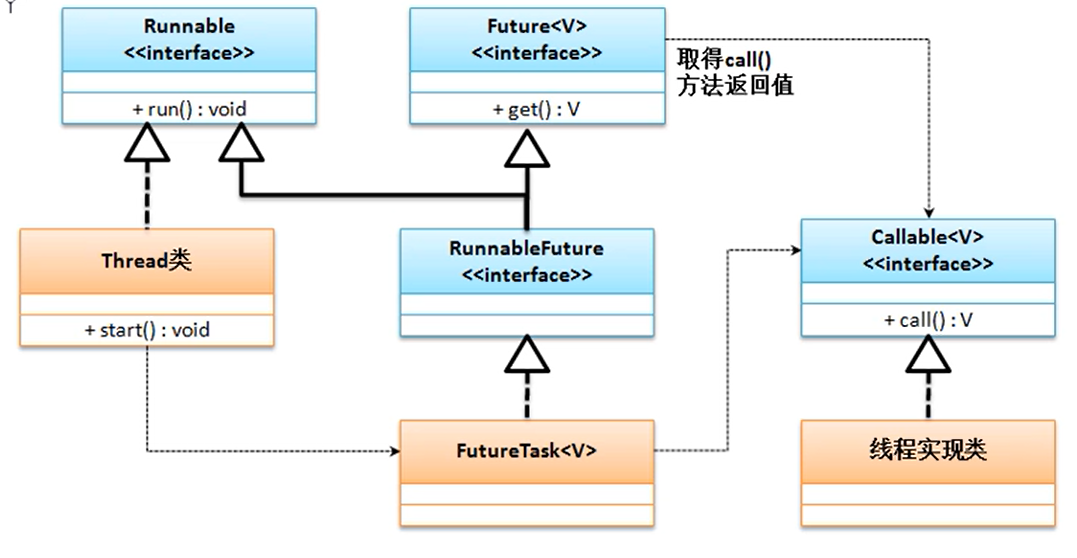
2. Callable 与 Thread 关系分析
3. 接口实现范例
使用Callable实现多线程处理
import java.util.concurrent.Callable;
import java.util.concurrent.FutureTask;

class MyThread implements Callable <String>{ // 1. 实现 Callable 接口并指出返回值类型
    // 2. 覆写 call()方法
	@Override
	public String call() throws Exception {
		for (int x = 0; x < 10; x++) {
			System.out.println("线程执行 x = " + x);
		}
		return "线程执行完毕!";
	}
}
public class ThreadDemo {
	public static void main(String[] args) throws Exception{
        // 3. 实例化 FutureTask 类,将线程实现类作为参数传入
		FutureTask<String> task = new FutureTask<>(new MyThread());
        // 4. 借由 FutureTask 实例化对象实现 start() 方法
		new Thread(task).start();
        // 5. 使用 FutureTask 实例化对象中的 get() 方法获得线程返回值
		System.out.println("线程返回数据: " + task.get());
	}
}
4. 面试题: Runnable 与 Callable 的区别?
Runnable是在JDK1.0 的时候提出的多线程的实现接口,而Callable是在JDK1.5 之后提出的;java.lang.Runnable接口之中只提供有一个run()方法,并且没有返回值;java.util.concurrent.Callable接口提供有call()方法,可以有返回值。
五. 多线程运行状态
- 线程启动用的是
start(),但此时对应的是“就绪态”; - 当线程处于“运行态”时,会执行
run()方法。 run()方法执行结束后,线程进入“结束态”


![[杂谈]-从硬件角度理解二进制数](https://img-blog.csdnimg.cn/02bcfebc19c94ac786d4fad8ec49c110.png#pic_center)